Saturday, January 31, 2009

peanut cookies

tried out the peanut cookies recipes..finally. It may seem a little over to still bake cny goodies now but hey! there's 15 days for the chinese new year right? So i'm not too late yea?

I actually adapted the recipes from Elyn found here and here. Peanut cookies I (as I name it) follows the recipe that's closer to the almond cookies I did earlier. However, to my disappointment, they didn't taste as nice as the almond cookies. They were less crisp, more melt-in-the-mouth kind. It doesn't taste horrible or unpleasant, but i guess it just didn't really entice my taste buds as much as the almond cookies did.

From the same batch of cookie dough, I made some cut-out ones and some rolled up one (placed in paper cups) Same timing needed for both kinds. It's more of which kinda you prefer looking at/or eating/making.
Peanut cookies
Igredients:
170gm self-raising flour
80gm Icing Sugar
1/4 tsp Salt
110g Corn or Canola Oil
1/2 tsp Vanilla Essence
80gm Ground Peanut
40g Coarse Peanut
Egg Yolk + few drops of water for brushing (Optional)
Method :
1. Sift flour, salt and icing sugar together.
2. Add ground peanut and coarse peanut, mix well.
3. Mix vanilla essence into corn oil and stir well.
4. Mix both ingredients and form a dough.
5. Shape into small round ball and slightly press it. [I used a cookie cutter to cut out shapes; for the small balls, i used 1/2 leveled tablespoonfuls of dough for each cookie]
6. Brush with egg yolk and bake at 170 degrees for 15 mins or till lightly brown
adapted from Elyn
Some may prefer to glaze their cookies and some do not. I personally the glaze just makes it look prettier. I'm getting pretty lazy at glazing the cookies, but, upon comparision, I think i'll still glaze it in future. Just that I'd have extra whites again.
Here's the second peanut cookie recipe (peanut cookies II - i call it). This peanut cookie is a really really different texture from the previous one. It's even softer and more melt-in-the-mouth than peanut cookies I. Definitely not my kind. Still frgrant with the peanut-y feeling and smell but too soft for my liking.

Again, I did it in 2 different styles, using the same batch of dough. It's better and easier if it was done in round balls. This is as, I realised that the cut-out ones break off as i was keeping them in the containers as they were simply too soft!

I won't be posting the recipe for peanut cookies II. If you're really interested to try it out, you can get it here.

Wednesday, January 28, 2009

sugi cookies

there's still such a long list of cny goodies i wanna try and it seems like i never have enough time for it. I planned to try out peanut cookies (2 recipes, both from Elyn) and sugi cookies which i have from Oi Lin's book all on the second day of cny. (since my mum said not going out for visitation)

Little did i know, so many people were visiting us instead! My helper was in a frenzy cooking from morning and washing up all the way till late afternoon. Relatives, friends etc came for lunch one after another and i hardly had time and space in the kitchen. I measured the dry ingredients and decided i should probably continue after everyone left. So, with all the dry ingredients from the 3 different recipes measured, i finally managed to start around 7 plus in the evening.

Sad to say, i only managed to attempt the sugi cookies. I chose that as the peanut cookies recipe was pretty similar to the almond cookies just a different kind of nut.

There are many variations of sugi cookies. Some call it sugi, some, sugee or some suji etc etc. For me, i THINK it's called as such probably because of the use of ghee in the recipe. Hence, for ME, i feel that recipes that don't use ghee, shouldn't be called sugee/suji/sugi cookies at all. Well, just a personal opinion.

This cookie is unbelievably simple to bake, with the simplest ingredient, the use of ghee is the main 'culprit' for this wonderful smelling yet highly sinful cookie.

Oi Lin's blog has a similar recipe posted, with the addition of ground almonds. I guess you could call that almond sugi cookies?
I really really love how fragrant and yummy this cookie is, but the thought of ghee in it prevents me from eating it excessively. If you're still in the cny baking mood, or would still like to try some cny goodies baking, or trying some recipes in preparation for next year, i would strongly strongly recommend you try these out first.
really simple and yummy!
Here goes!

Sugi cookies makes about 43-44 cookies

Ingredients:
100g ghee
120g caster sugar
1 egg yolk
1/2 tsp vanilla essence
150g plain flour (all-purpose flour)
1/4 tsp baking soda
1/4 tsp salt

Egg glaze: egg yolk + few drops of water

Method:
1.Mix first 4 ingredients.
2.Sift flour, baking soda and salt. Mix and add to above.
3.Mix to form a dough.
4.Scoop dough with a 1/2 tablespoon, shape it with your hands (see video) and arrange on lined tray.
5.Brush with yolk glaze.
6.Bake in preheated 180 degrees Celsius / 350 degrees Fahrenheit oven for 14 minutes till yolk glaze on cookies look golden yellow and bottoms of cookies are golden brown.
7.Do not overbake!! Do not underbake either or cookies will not be crisp.
8.Allow cookies to cool completely on a rack and store in container.

adapted from Oi Lin's Delicious Asian Sweet Treats

recipe notes:
-the recipe posted in Oi Lin's blog is slightly different with the addition of ground almonds.
-She also uses a different measurement for each cookie. Her recipe with ground almonds uses 1 teaspoon while this plain sugi cookies recipe uses 1/2 tablespoon.
-Do place rolled cookies at least 2 cm apart as they spread during baking. Hence, the final shape seen here.
-The bake temperature and timing yields a crispy, crunchy cookie.

honey cornflakes mini cup

Actually, I'm cheating on this post..My younger sister was the one who attempted this really really simple yet yummy cornflakes snack.

I came across the recipe for this snack on Elyn's blog and somehow remember that my younger sister asking me if i knew how to bake that and if i could make some for her. I immediately showed her the web page and asked if that was what she was referring to. and yes! i was right and she got all excited about it.

I scanned through the recipe and was amazed at how easy it is to put it together, so i told her, why not you try it yourself? since it's pretty fast, easy and hassle free. So finally, on Saturday, she made it on her own all by herself. She couldn't wait for me any longer as i was always busy with something else or finishing up my orders. That was the day i went on the probably longest baking hours so far, finished baking 120 open top pineapple tarts, 1 8" kueh lapis and 70 almond cookies. All in a day. ( a little slow i would say, taking my own sweet time) ha.

I think it's a really simple recipe and probably a Saturday afternoon activity to do with kids or something..

Honey Cornflakes mini Cup makes about 35 mini cups

Ingredients :
40g butter
1 tbsp sugar [omitted sugar and replaced with honey]
1 tbsp honey
2 cups corn flakes
1/2 cup nuts (optional)
Raisins (optional)


Method :
1. Melt butter over low heat. [I helped her melt it in the microwave, on high just for a few seconds will do. Do not let it bubble.]
2. Add in sugar and honey, stir till sugar is dissolved.
3. Add in corn flakes, nuts or raisins and mix well.
4. Spoon into small paper cups and bake at 180 degrees for 10 mins.


recipe notes:
I melted the butter in the microwave as I was too lazy to get the pot out and double boil it etc..I just stood outside the microwave observing the butter till it's melted and took it out. (Probably don't recommend this often for the fear of mutated DNA -microwaves mutate our DNA)
My sister measure wrong amount of sugar so i just told her to add more honey. I guess it's really up to your taste entirely and just adjust accordingly.
We didn't have nuts/raisins, so my sister replaced it with 1/2 cup of fruity pebbles (since she likes them alot). Works fine too, and she's proud of her "invention" zzz

I'm not sure if this is supposed to happen, but the cornflakes "shrink" after being baked. Not too sure if it's because the honey/butter melted and the clump became more compact. oh wells.

Verdict: simple yet delicious. Do give it a try!

Sunday, January 25, 2009

Thank You!

I know this post has come a little late, nonetheless, I would still like to extend my heart-felt thanks to all who have ordered from me this year.

I sincerely hope you and your family enjoyed the goodies as much as I have myself =p

I'd also take the opportunity to wish everyone a Ox-picious Niu year =)

祝大家,新年快乐!万事如意!心想事成 =)

Thursday, January 22, 2009

Kueh Lapis a.k.a thousand layered cake (千层糕)

After slogging for five hours (preparing the ingredients till finish baking it)..finally..a post on kueh lapis. I think i've mentioned it a few time in a few of my previous posts, but it seemed as if i was only obsessed with making pineapple tarts and almond cookies.

Well, I did attempt one kueh lapis some few days back, but it was just not pretty enough for a photoshoot. This time, I made this for a friend of mine, Hui Min, who very kindly ordered a couple of cny goodies from me, including this kueh lapis. I hope she and her family likes what i've baked =)

I am pretty satisfied with how things turned out. Not too charred/black, layers visible and definitely taste like kueh lapis. Although I've upped the spice again this time, but i felt it was still lacking a little.

A little surprise from the people at home. My younger sis told me this was much much tastier than the ones i made before (though i really think it just all taste like kueh lapis, duh~) and my other sis "couldn't stop eating" it. I'm really really glad they love it. =DD

A friend commented that the layers are much thinner than what is sold outside and i kind of have to agree. Although i've increased the amount of batter for each layer from the original recipe, it still looks thin. But I guess i'm satisfied with how it is and am gonna stick to it. I have to admit its real tedious work to bake this kueh lapis. Having said that, i actually quite enjoy the process as well. And it is always the anticipation, excitement and eagerness when it is cooling to see if the layers turns out nice and visible.

Although i wouldnt say it looks really professional, but i am really really satisfied with the product. I think i probably will venture into trying out those with pitted prunes..soon..i hope..

I remember the crazy period i went through, mad about baking kueh lapis. I was just sooo intrigued by how it was done and how each and every single layer produces this fascinating looking cake. Though, i must say, i'm not really a kueh lapis fan =X

I looked for recipes everywhere, even bought a book on it. Before I had fixed my built in oven, i was using the Sharp Water Oven. Many failed attemps in there before i finally understood why. It turns out that the lapis should be grilled! Hence, as the layers built up, only the newest added layer gets cooked, preventing from the previous layers from being charred. My Sharp Water Oven didn't have a upper grill element (unlike built in ones) and that explained my multiple failed attemps. I would consider myself mad as well, having baked a lapis every single day for one week with only the last one being successful.

After that, it was lapis overdose and i never attempted it again until the trial a few days ago. The recipe I'm using is from Rose's Kitchen but i have adapted it and changed several proportions in the recipe. I have included the recipe below so those who wants a shot at this "thousand layer cake" can try it out.

*disclaimer: I have not tried a real indonesian lapis before and hence cannot comment on the authenticity of the outcome of this recipe. The lapis i have always or ever eaten are from bengawan solo. I can't give a comparison though, as it has been a while since i had them, plus, i'm not a fan of lapis. so..there you have it.

Kueh Lapis (makes one 8" x 8" x 2.5" lapis cake)
Ingredients:
A
:
25 egg yolks
100g sugar

B: 5 egg whites + a pinch of cream of tartar
100g sugar

C: 500 gm butter (Golden Churn)
1 tin condensed milk
1 tsp vanilla essence
2 tbsp golden syrup
1 ½ tbsp brandy or rum
1 ½ tbsp mixed spices

D: 170 gm plain flour
Method:
1. Sieve Flour (Group D) and set aside.
2. Cream butter with condensed milk, vanilla essence, golden syrup, brandy & mixed spices (Group C) till well mixed and set aside.
3. Beat egg yolks with sugar (Group A) on high for about 10 mins until thick and creamy (i.e. ribbon stage).
4. Add beaten egg yolk mixture to the creamed butter mixture and mix well. Fold in sieved flour.
5. Beat egg whites with a pinch of cream of tartar and sugar (Group B) till stiff and fold in the mixture. [Beat egg whites with pinch of cream of tartar till frothy on medium speed (speed 3 on kMix) for 1 min. Add in 1/3 of sugar, continue beating for 1-2 mins. Add in the second 1/3 and continue beating 1-2 min. Add in the rest of the sugar and beat for 1-2 min. ]
6. Preheat oven to 180 degree C. (baking mode: top + bottom heat) Grease and line an 8″ square tin and preheat tin [Just preheat for a few mins to make the tin hot, making it easier to spread the batter]. Grease bottom and line base only.
7. For first layer, spread 3 - 3 ½ tbsps of mixture in tin and bake in oven at lower middle/ lower rack at 180 degree C for 10-15 mins. Or until lightly browned. [timing may differ depending on individual ovens. Just bake till surface is lightly browned] Use a satay stick, prick holes (if there are air bubbles) into the lapis and gently press the lapis with a lapis press to ensure the layer is even.
8. Switch oven to grill mode. (i.e. top grill only)For subsequent layers, grill each layer at lower middle/lower rack for about 3 mins. Or till lightly browned. [timing may differ depending on individual ovens. Just bake till surface is lightly browned. The darker the surface, the darker the layers will be later. The brown surface is what defines each layer.] After removing from the oven, use a satay stick, prick holes into the lapis (if there are air bubbles) and gently press the lapis with a lapis press to ensure the layer is even. Repeat this for each layer.
9. When top most layer is completed, switch oven back to baking mode (i.e. top + bottom heat), cover with a metal tray or a piece of foil and bake at middle rack at 180 degree C for a further 5 min. It will take longer if the sides are still wet.
10. When the cake is done, turn cake out onto a metal grid. The lapis with 'fall' out on it's own. Let it cool on the cooling rack completely before cutting. If cooling rack markings are not wanted on lapis surface, flip it right side up after cake has 'fallen' out and let cool completely before cutting.
adapted from Rose's Kitchen
notes:
1. it isn't a really easy cake to make, yet not very difficult either.
2. it is important to know "how brown" should each layer be and may differ from time to time even with the same oven. So, it is best to sit in front of the oven and observe and remove it once the layer is done and proceed with the next.
3. DO NOT stir the batter during the whole process. i.e. the last time you should be stirring/mixing the batter should be when you're folding in the whites. Once the batter is ready, and you've started baking, so not stir it anymore.
4. You will notice that liquid comes out of the batter towards the end of the process. DO NOT stir to mix the liquid into the batter. Be careful not to scoop up the liquid to spread in your layers. If it becomes too difficult to scoop without avoiding the liquid, discard the batter. You should be on your last few layers by then.
5. Try not to spread the batter too fast/too slow. It is difficult to explain the consequences of doing so. Practice would probably get you accustomed to how you should do it =)
6. Lapis spice can be bought from major supermarkets, phoon huat, sun lik, etc. I get mine from sun lik.
7. The brandy/rum can be omitted if not available or if you're halal. Replace it with either orange juice or water. [updated 30 Jan '09: brandy/rum usually added to prolong "shelf" life - not too sure how true is this fact though]
I understand that it is a little difficult to visualise the whole process although you may have read through the recipe umpteen times. It is really pretty different when you are actually baking it. Here's a video which i found really really useful as I was making my numerous kueh lapis attempt last year.

Cherry's blog provides a recipe as well, but i did not really like the outcome of it and how it tasted so I switched to using Rose's recipe after trying it out. I can't really say that cherry's recipe is bad or what, I guess it just didn't suit my family and friends' taste buds. But do give it a try if you wish too.

I hope those interested would give making kueh lapis a try =)

Update  (March 6th, 2010): I've finally posted my own video HERE !

Tuesday, January 20, 2009

cny cookies try-out

I've been baking quite a fair bit of pineapple tarts, almond cookies and kueh lapis. That's why the lack of pictures and posts since they're always the same things.

I didn't take a picture of the kueh lapis as I mentioned in an earlier post is was a practice bake for me. It was baked a little too brown but still taste good. Not too pretty for a photoshoot, so i skipped taking photos of the overly-browned kueh lapis =p I think I might also up the spice to make it more fragrant. hmm..

As a result, i don't have much time to play around and try out other cny cookie recipes =( and after baking batches of pineapple tarts and almond cookies, i've yet to bake any for my family! =X hopefully i'd have enough pineapple paste to go around..

I hope after completing all the 'orders', i'd have time to bake and try out more cny cookies! *fingers crossed*

Monday, January 19, 2009

120 pineapple tarts

Managed to finish baking 120 pineapple tarts, tangerine-style today in a few hours. From rolling the pineapple filling, to measuring and weighing out the ingredients for the dough, combining them to form the dough and shaping each and single one of them and finally, sent them off for baking.

It was a little tedious at first, but when i got used to things, things speeded up a little, though i think i should work even faster in future. packed them into the quantity my friends requested for and put on some nice ribbons and gift tags.

I really hope they like it =)

Sunday, January 18, 2009

chinese new year "orders"

I sorta had a "unofficial" cny cookies sale. Sale items were pineapple tarts (both versions), almond cookies and kueh lapis. Although I wouldn't say that they were huge orders, but i guess it was enough to keep me busy. After all, school started and i had to juggle between buying the ingredients, preparing the ingredients, getting used to going back to school (i.e. waking up early) and my other commitments as well.
Thank God I had D to come help me now and then. I even had to have a practice session baking kueh lapis as it was in last september when i crazily attempted making kueh lapis 4 days in a row!

I have orders yet to be completed and this is my first!
I designed a really simple gift tag, added some flowers to give it a cny 'feel'. At the back of the gift tag are a list of ingredients in the cookies/tarts. Was unable to capture it on camera but yep!

Hopefully this gives the usual plain red-cap containers a slightly different touch.

I have since learnt that baking for oneself's own consumption and to giveaway as gifts and to be sold are very different. I had to estimate the amount of cookies/tarts that could fit into which kind of containers, price them reasonably and made sure I could arrange them "professionally" etc etc. I'm quite glad to have gained this little bit of experience.

To D: No, i won't get sick of baking of so many pineapple tarts and cookies =p

Tuesday, January 13, 2009

almond cookies 2

I'm sorry for the posts that keeps repeating themselves. I'm experimenting and trying to arrive at recipes i really like and would use again and again. I've baked almond cookies again, yes, again, and I can only say I'm totally in loveee with this recipe.

It uses no egg, unlike the previous recipe so i guess you can consider it vegetarian? I'm not sure. I'm not one myself. But the simplicity of the ingredients, plus the simplicity of how quickly everything can be put together would definitely make me bake these little treats again and again and again.

The difference this time is that 1. no egg involved, 2. more oil used, 3. a mixture of ground and diced almond used. I'm not sure if it is because of the amount of oil and absence of the egg that gave it a really light yet crispy texture. In chinese, we call it 松脆. As compared to the previous recipe, it was simply crispy. I'm sorry about the poor description here, but this is truly truly delicious and yummy =) The recipe is very very versitile in a sense it can be used for both the rolled up kind and cut out cookies without much adjusments to the oven temp and bake timings.
Well, I finally bought a bigger flower cookie cutter and I was trying to take a similar picture in my previous almond cookie post to make a comparison of the size of the cookie. It is roughly 1.5 to 2 times bigger than the previous one. Because of the increased amount of oil used (i think) the dough was much "softer" and hence the cut out may not have looked as neat and clean. Nevertheless, it was much easier to cut it out this time as the previous dough crumbled too easily. Also, I didn't have to actually flour the work surface and rolling pin. I guess I kind learnt how to work with slightly soft/wet doughs and the trick is always to roll it lightly and not place too much pressure. Of course there are certain doughs that will still require flouring, but lazy as i am i'm always on the look-out for short cuts =p
I took a fellow blogger, cookie's advice and diluted the egg yolk before i brushed it on and this time, it didn't look as brown as the previous time. thanks cookie!

Monday, January 12, 2009

new toy


presenting...my new kenwood kMix! I was supposed to bake kueh lapis today and was fretting over the process. I had to whip the egg yolks till thick and creamy and also the egg whites to stiff peaks.

I wasn't sure if i could leave the egg yolk mixture out for a while, while i wash up the mixing bowl and wire whisk to whip up the egg whites. I have a hand mixer and i know that would solve the problem. However, it's kinda spoilt and i'm not really inclined to use it.

Just then, i got D to come along to help me out with the kueh lapis. and guess what? He bought me a kMix!! I was looking at it quite some time ago and really liked the 'cool' design but it was really a little pricey. Thank you D! A very very nice, pleasant surprise indeed.

On the other hand, while proceeding with cracking and separating the eggs, we discovered half were expired and spoilt! and my goodness! it was so so so smelly =XX so..no kueh lapis today =(

Despite the fact that i didn't get to bake my kueh lapis, i was really excited and happy and elated and etc etc that i got a new hand mixer. Hmm, will i start abandoning my kitchen aid? not likely i suppose =p

happy! =D

Sunday, January 11, 2009

pineapple tarts...again!

Sometime back, i attempted some pineapple tarts which i felt were too soft for my liking. Hence, i'm experimenting some recipes to yield some tarts with more "structure" and a little "crunch".

These tarts i made today are a little less soft than the previous time but somehow lost that buttery fragrance which i quite like. Probably because of the less amount of butter used. I'd start on another pineapple tart experiment soon on how i can increase that buttery aroma and yet retain that slight structure.

The pineapple tarts weren't crunchy per say, but were a little be firmer than the previous ones. However, the melt-in-the-mouth recipe is more suitable for tangerine styled ones as they are muchhh easier handle when wrapping the pineapple jam.

Today, both my sisters helped me out with the pineapple tarts, one rolling the pineapple jam and the other working on the tangerine styled ones. We were bored after a while of the same old pineapple tarts and decided to use whatever we have and try out different styles. Here you see rectangular ones, triangular ones and one even made to mimmick a real pineapple with all the cuts in the dough =p

I tried out 2 different recipes. The one with the wet dough is something i sorta pieced and put together and based on my knowledge of each ingredient i attempted to turn it into a recipe that i THINK i'll like. However, I did not read the recipe properly (as i halved it) and put the whole egg in instead of 1/2 egg. As a result, the dough became really wet and i had to just chill it before using it. Surprisingly, despite the 'wet' dough, i was able to roll it without flouring the work surface or rolling pin. cutting out the shapes were easier too just that transferring them to the baking tray got it a little distorted. =X

i have a feeling things would be pretty much alright if i added in only 1/2 egg instead. Oh well, more experiments coming my way!
Here are more 'crazy' designs we did. Instead of the usual dot or cross or 'tic tac toe' pattern etc, we started trying to make "faces" out of it. It was really tedious though as we had to cut and trim and place them carefully on top. But it was sure nice, looking at these pineapple tarts that looked different from usual. A really nice fun family activity i suppose?

I'm glad i asked one of my sisters to help out and she was the one who started making these faces. She was pretty troubled with certain things and i thought this would probably keep her occupied for a while and i'm really glad she had so much fun with making these.

I hope i'll see her just like this smilely pineapple tart very soon again! Cheer up yea?

Wednesday, January 7, 2009

almond cookies

Almond cookies are yet another favourite during the chinese new year. These cookies are incredibly fragrant and nutty and are crispy at the same time. Somehow, they don't quite taste/feel the same as they're western counterpart. If you've haven't tried one before, I strongly suggest you do (unless you have an nut allergy) For people with nut allergy, they probably could try out suji cookies, which are actually crunchy butter cookies made with ghee. I haven't baked those for myself before but that will probably be on my to-bake items.

Today, I got myself a helper..my sister! Here she is, levelling out the baking soda.


I'm not sure if we got it wrong somewhere along the way, but the dough was really too crumbly. So we added more groundnut oil according to feel, so I also don't know exactly how much we added in total. We had a bit of issues cutting out the dough as it keeps breaking apart. I realised afterwards that those that have been rested for a while were much easier to handle with. Also, the cutter we used were too small! So I had to adjust the bake time and temp. [170C; 10 min]As a result, we had mini almond cookies instead which were equally delicious!
It was pretty difficult to roll the dough and i didn't wanna add too much flour. so i had flattened it with my hands a little so that minimal rolling would be required. I guess that sufficed for the moment. If i were to do it again, I'd 1. get a bigger cutter. 2. Probably add more oil/egg

We glazed the cookies with a whole egg. I was too lazy to separate and use just the yolk and it worked just as fine! Sprinkled on some sesame seeds for deco and off they were into the oven!

They were a tad too brown but still really yummy!

Look at how mini it was! I guess i really gotta use a bigger cookie cutter the next time round =X
I was pretty lazy to carry on rolling and cutting the remaining dough, plus i only lined 2 baking trays. So i thought of shaping the rest of the dough into balls (as seen from Elyn's blog) and placing them in small paper cups. that way it'd be so much easier! Like wise, we glazed them and sprinkled some sesame seeds over. These were thicker and larger, so i placed them in the oven longer. [170C; 15 min]

There you have it! All 100+ mini almond cookies packed into one small cny container! O.o


Something else to add, I was just browsing through and little did i realised that it has been a month since my first post! I really do hope i can persevere and not abandon updating this blog with my baking adventures and see myself celebrating my blog's yearly anniversary! *cross fingers*

Tuesday, January 6, 2009

more baking trays..

I've come to realise the importance and convenience of having spare baking trays on hand. It really does help speed up baking. All the dough can be placed on the baking trays and they can be popped in one after another without having to wait for each to cool in between.

Another finding. I feel like it is a good investment to get swiss roll trays. they can be used to bake swiss rolls and double as a baking tray! They're light-weight and because of that material, they heat up/cool down pretty quickly. they come in a LARGE variety of sizes which makes baking in big batches easier.

Hopefully someone finds this small tip useful =)

Monday, January 5, 2009

happy birthday dad!

happy birthday dad!

Today's my dad's actual birthday. We actually had a celebration dinner at the marina barrage yesterday together with some uncles and aunties and cousins. Since today's a weekday and my dad was a little busy with work, my sis and i decided to bake a little something as our gift to him.

We initially wanted to shop for a birthday gift for him on friday, but had no idea what to get for him. We finally decided we should just probably bake something for him, he'd probably be more touched that way =p

As we lit the cake and brought it out of the kitchen, my dad looked puzzled and said "这个蛋糕几时买的?为什么我没有看到?" ("when was this cake bought? Why didn't I see it earlier?") My heart skipped a beat. Usually, my dad is full of criticisms for my bakes, not sure if he meant it or he is just being sarcastic. Whatever it is, I'm just glad he likes the cake and how it looks =)


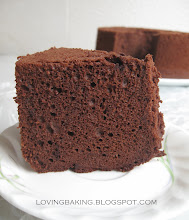
I suspect the cake wasn't baked to perfection. The middle portion felt a little "hard" or rather "compact" while the portions nearer the side were nice, moist and fluffy. The batter was probably too watery? I am unsure.
We had a little accident actually. The cake rose too high in the oven, it began to crack ALL OVER. As i inverted it to cool, the portion that rose out of the tin got squashed (which also might be the reason why the middle was compact) To our horror, as we removed the tin upon cooling, the base of the cake sunk! it was like a giant crater!
Well, I guess it'd evident why we only ended up with a 2 layered cake although i mentioned that it rose TOO HIGH. All that was left after trimming and saving the looks of the cake only allowed 2 layers. We had coffee whipped cream as the filling which was really yummy! and i regret not filling up a thicker layer. The whole cake was covered with the balance whipped cream and garnished with grated dark choc and oreo cookies. As you might have guessed, all that fanciful grated choc and oreo cookies were just a desperate effort to cover up my lousy frosting skills bahhh
The cake tasted ordinary but the mood was extra-ordinary. My dad was really happy (i could really tell) and naturally, i was happy too! My dad isn't young anymore and i really wish him good health and a big thank you to him for taking care and providing for the family all these years =)
happy birthday!

my first pineapple tart order..

I have just receive an order for 60pcs of open top pineapple tarts, 60pcs of wrapped up ones and 1 6" by 6" kueh lapis. I am really really thankful and grateful to have receive quite a "huge" first order.

I'm not sure how many have been reading my blog. I mentioned somewhere in my kueh bangkit post that a friend of mine requested that i make some pineapple tarts this cny. this is also largely why i baked those pineapple tarts, just so i could let her taste some.

I am really thankful and grateful to her for placing her cny goodies orders with me which makes me a little apprehensive as well. After all, this is my very FIRST order. I have baked many many things and given them away. Although many people commented that i should sell some stuff, but i guess that wasn't really my intention. I just really enjoy the process of baking and seeing that my friends and relatives enjoy the bakes makes me really happy =)

She turned down my request for me to turn her orders into my gifts to her instead and insisted that she does it as a proper business transaction. I just want to let her know how much i appreciate and thank her for her kind gesture. thank you sally! =DD

I am somewhat glad to have receive this order in that i hope that i will have learnt something from this process. i.e. managing my time, packaging the bakes and etc.

wish me luck! and once again, a BIG thank you to sally! =D

Friday, January 2, 2009

pineapple tarts - recipe included

In my previous post, I did 2 kinds of pineapple tarts: wrapped up ones and open tart ones

As I used recipes from a published book (Delicious Asian Sweet Treats by Oi Lin), it would be inconvenient for me to post it up on the net. The 2 kinds of tarts differed not only in its appearence but it's recipe as well. The wrapped up ones contains eggs, while the open tart ones are eggless (i.e. suitable for vegetarians)

I somewhat remembered that the vegetarian version was up on the web as a 'free' recipe to try for those interested to buy the book. This means, i should be able to post this recipe up =)

This recipe yields tarts that are soft and buttery. So, if you're the sort who loves the soft, buttery and melt-in-the-mouth kind, you're in for a treat. I am also including the recipe for making your own pineapple paste. There are many others out there, but i'm satisfied with how my pineapple paste turns out, so i'd just stick with this. Those who find it troublesome can always ready-made ones from phoon huat or sun lik.

Pineapple Paste/Jam makes about 150g

Ingredients:

  • 1 ripe medium sized pineapple
  • 70g caster or fine granulated sugar (adjust to your own taste - i used about 55g)

Method:

  1. Slice of crown and base of the pineapple. Remove pineapple skin and the dark brown spots.
  2. Slice pineapple vertically into 4 pieces and remove the core. It is hard and may taste bitter.
  3. Grate the pineapple or use a food processor to puree it. (I blend it using a blender till puree like)
  4. Place puree in a non-stick pot and cook under medium heat. Stir occasionally.
  5. When the pineapple puree has thickened (about 1 hour), add sugar.
  6. Cook on low heat till the puree becomes a very thick paste.
  7. Let the pineapple filling cool. wrap and chill overnight to further thicken it. This makes it easier to roll into small balls for use in a recipe.
  8. Freeze filling to make it last for a month. Thaw at room temperature before use.

notes:

  • there's no right or wrong way in cooking the pineapple paste. much depends on the pineapple itself.
  • if the pineapple is ripe/sweet, less sugar is required to sweeten it. If you prefer a more tangy paste, reduce the sugar. Do not add in all the sugar at once, add in some and do a taste test to see whether to add more.
  • The timings (1 hour) are just a rough estimate. It also depends on how 'dry' the puree has become. Cook till semi-dry i.e. not much juice left before adding in the sugar. (I cooked for about 1hr15mins)
  • The duration of cooking also depends on how moist or dry you like your paste to be. Do remember though that the paste dries out a little further when being baked in the oven.
  • amount of pineapple paste at the end also depends on how big the pineapple was.
  • [updated]: it does not matter if you grate or blend the pineapple. Grating the pineapple results in more "fibres" while blending is results in a jam that is "smoother".

adapted from Delicious Asian Sweet Treats by Oi Lin

Vegetarian Pineapple Tarts

Ingredients:

  • 3 portions (450g) pineapple filling (see above)
  • 360g plain flour plus extra for dusting
  • 60g icing sugar
  • 300g cold unsalted butter
  • 1 tsp vanilla essence
  • 1/4 tsp yellow food colouring (optional)

Method:

  1. Sift flour and sugar. Mix Well. Cut butter into small cubes and add to flour mixture. Use fingertips to rub the butter into the flour. Add vanilla essence and colouring and combine to form a dough. Wrap and chill the dough for an hour to firm it up.
  2. Line a baking tray with greaseproof paper.
  3. Divide dough into two portions. Keep one portion chilled. Roll the other portion (on a floured surface) to a thickness of about 7mm. Dip a cookie cutter in flour and cut out shapes. Use a scraper (or knife) to lift the shapes and place on the tray. Brush egg yolk over the shapes if you're baking non-vegetarian tarts.
  4. Preheat oven to 190C
  5. Roll pineapple filling into small balls and place on shapes.
  6. Bake for 12 mins. Allow tarts to cool completely on a wire rack before storing in an airtight container.

notes:

  • rubbing in-method: you will not get to the 'breadcrumbs' stage as the propotion of butter to flour is simply too high and impossible. before you know it, a dough is forming. That is ok. Just rub in to form a dough.
  • you dont have to chill the dough for up till 1 hour. it all depends on whether you're comfortable with the softness of the dough to roll out. of course, a firmer dough would be easier to roll.
  • As a rough guide, i used 1 level tsp of pineapple paste for each tart. More or less can use used, adjust according to your own taste and preference. This is why i like making my own tarts. =)

adapted from Delicious Asian Sweet Treat by Oi Lin

I personally prefer tarts with more structure and not so soft. Will experiment and see if i can come up with something i like better..

Thursday, January 1, 2009

pineapple tarts!!

nope! my laziness didn't get the better of me :) Although i did procrastinate at one point in time, i managed to overcome my laziness and churned out some wonderful smelling pineapple tarts.

Here's some pictures illustrating the rough process of making pineapple tarts:

I started off by preparing the pineapple paste (filling). I avoid using commercial, ready-made ones as they often tend to be too sweet and a little on the 'dry' side. It's my second time preparing the pineapple filling, but the first try was so long ago! Nevertheless, it turned out pretty alright and not too sweet, just the way i like it. =)
I'm trying out 2 different styles of pineapple tart here, both of which, i believe, are familiar to many.
1. wrapped up style/tangerine style
2. open top (which we're most familiar with)

For the wrapped up style, no rolling/cutting of dough is required. I measured out equal quantities of pineapple filling and dough which ensures that each tart is of equal size. I somehow prefer making this as there's less clean up and not rolling and cutting of dough =p


For the open top style, first you gotta roll out the dough and cut it with a pineapple tart cutter (or any other cookie cutter) and then place the rolled pineapple paste on the cut out dough. The only thing i don't really like is imprinting the pattern on the dough.
Guess i'll try figure out an easier way to imprint the patterns fast and clearly. What i did was to cut out the dough and place them on the baking tray and use the other part of the cutter (it comes together) to make the patterns. I discovered that the dough increased in diameter as i tried to push and create the pattern, which probably made it look bigger and 'thinner'.
Nevertheless, it still turned out acceptable looking, though not the prettiest you may have seen.


If you've read my previous posts, you'd realise that a friend asked if i do bake pineapple tarts and expressed interest in getting some from me this chinese new year. I would love to bake some for her but i gotta make sure she's satisfied with the product.
So here it is, all packed in one bottle for a taste test before i confirm with her if she really wants to order some tarts from me. I've also put in some of the kueh bangkit i made previously and if she likes it, i'd be more than willing to make some for her as well =)
Hope she likes it!
It's my second try at making pineapple tarts and for some odd reason, i find it much easier to do it this time round. Is it because of the famliarity? or, it is because i've been baking much more and gain more 'experience'? Whatever it is, i'm happy i made this small small batch of pineapple tarts. Btw, both had a soft, melt-in-the-mouth texture with a buttery taste =) Although, i feel i might use another brand of butter to increase this wonderfull buttery aroma..hmmm
till then..
recipe here

next up..

firstly, some updates about my kueh bangkit. my mum liked it, saying it tastes like those sold outside and asked if i could give one of the 2 containers to my uncle *smiles* brother finally couldn't resist and said the taste is there just a little too crispy for his liking. *scratch heads* boyfriend (a big fan of kueh bangkit) gave it a shot and said yummy! like those sold outside =DD

although some of it did taste "crispy", upon closer examination, we realised those crispier ones were really thin and my mould was a little bigger than those sold outside. those thicker ones felt perfect.

to conclude, the dough should be rolled to about 4-5mm thick but don't be too worried how thin it must be. A thicker cookie just has to baked longer while a thinner one shorter. In my opinion, it's more difficult to judge the doneness of a thinner cookie. so yep!

as the post title suggests, next up! would be of course, pineapple tarts. I've just finished cooking the pineapple paste at around 1am and gonna bake up some pineapple tarts tmr =) hopefully the laziness doesn't get the better of me.

As i looked around the internet and indulge in recipes and recipes and more recipes, i'm just so excited to embark on a cny festive goodies baking spree!

can't wait to try out some almond cookies and peanut cookies. I went on a crazy kueh lapis experiment some time back (before i started this blog) and hopefully i'd find time to bake some kueh lapis soon. The thought of the number of eggs involved scares me a little though =p

Look out for my pineapple tarts! and of course, happy new year to all! hopefully 2009 brings us more hope and joy =)
a peep at last year's pineapple tart try out..


Related Posts with Thumbnails