Thursday, February 26, 2009

my bane!

I titled this post "my bane" for a reason, yes, swiss rolls are my bane. They made me annoyed, frustrated and sleepless. The first time i embarked on my swiss roll journeys was sometime last year, before i started out this blog.

I failed countless times, from a swiss roll that became a layered cake (so can you imagine how badly it cracked? no, infact it tore apart zzz) to a swiss roll that was with cracks, to finally, a swiss roll without a crack. yay! BUT, still looks pretty ugly.

I stopped making swiss roll after my last attempt which i considered a "success" since it didn't crack because i was afraid that i just got lucky. This time, i faced my fears and tried it again.

The picture below, were the last few swiss rolls i did before this chocolate swiss roll. See how horrible they were? I tried various recipes/methods.

top left:
-sponge cake method
-rolled up perfectly
-cake was super dry. *faints*

top right:
-chiffon cake method
-rolled up like crap, with tiny cracks here and there
-tasted superb!

For a while i hoped they could combine their powers and i'd arrive at my totally perfect swiss roll. but no, it didn't happen in my dreams. Then on, i went to try a green tea flavoured one..oh my! it had a huge crack. that was it. I had enough. No more swiss rolls. till now.

I've no idea what made me conquer my fear, but somehow i did. To make things worse, I even tried rolling with fruits in it! I must be crazy. Rolling it up without a crack was bad enough, and to roll it up with fruits?!

Well, I braved my fears and went ahead. to my surprise, the cake was soft, springy and really "foldable". I guess people who failed in making swiss rolls would probably understand my agony. If you've ever come across sheet cakes that are dry like anything, they crack and give way the moment you start. And i tell ya, that's uber heart-breaking. and annoying!

This time, I did not try folding so much in the beginning for the fear it would crack and i would cry, so that explains the really ugly turn out. Also, my 1" thick cake became 1/2" thick probably cos i was over-zealous in tightening the roll like nobody's business. (wrong choice)

and of course, i stuck to the chiffon method because somehow, i just feel safer with it. I can never fold in flour into beaten eggs without having bits of flour here and there.

Although things turned out ok, i still don't know when will be my next time attempting another swiss roll. =X

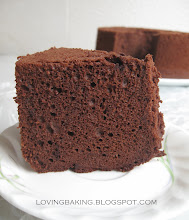
And now, the recipe. I adapted it from some HK blog and made minor changes and translated it to english. for the original version, please refer here

Chocolate Swiss Roll makes one 11" x 14" cake
(Printable Version)

Ingredients:
(A):
80g egg yolks (about 5 egg yolks) **
40g caster sugar
67g corn oil
50g water
1/8 tsp salt

(B):
85g cake flour
15g cocoa powder
1g baking powder

*sift together

(C):
167g egg whites (about 5 egg whites) **
50g sugar
¼ tsp cream of tartar

**: depending on size of egg

Method:
1. Preheat oven to 170C.
2. Line a 11” x 14” tin. *no need grease
3. Whisk together egg yolks and sugar (group A) till pale yellow or till sugar dissolves.
4. Add in salt and corn oil, emulsify well.
5. Add in water, stir well to mix.
6. Add in flour mixture (group B) and mix to form a smooth batter. *batter will be quite thick
7. Whisk egg whites with cream of tartar until foamy, add in sugar in 3 additions and whisk till stiff peaks form.
8. Fold in 1/3 of the beaten egg whites into the prepared batter. Fold in the rest of the egg whites 1/3 at a time. Be careful not to deflate the batter.
9. Pour batter into tin and bake in preheated oven for 20 min.
10. Remove cake from oven when done and let it cool.
11. Unmold the cake and spread desired fillings and, using parchement as a guide, roll up.
12. Refrigerate cake at least 30 min to allow shape to set. Cut and serve =)
Here's a video showing how roll up the swiss roll with the parchment as a guide.
Good luck!
updates: the swiss roll stayed soft and moist despite leaving in the fridge uncovered for 1 night.

happy belated V'day

A very very belated V'day cake and post. Well, I really did wanna do something special on v'day, but i was caught up with tests and baking other simpler stuffs. Finally, i had some time to do much more, but as seen, didn't turn out very well. I really did at once think of not giving to D at all since it looked so horrible, but then again, it's the thought that counts, isn't it? haha~

as you can see, the cake was "sweating" while i tried my very best to snap pictures of it. the rest came out really unsatisfactory, so only 1 picture for this post =( Well, i seriously haven't been able to capture pretty pictures these days. (not that i did before, but it just seemed to get worse now =X)

Anyway, I'm not a person with all that birthday, anniversary stuffs. to put it simply, i'm pretty "boring". But this time, i actually made the effort to surprise D at his void deck! and well, i guess he was really pretty surprised with the cake. (from the look of his face) I wanted to surprise him at his office initially, but the cake was too hedious and i didn't wanna let his colleagues see my lousy caking skills. ha~

I finally decided to give him, because:
1. it has his fav strawberries in it
2. the cake layers were super good!
3. the ingredients were expensive =p

and of course, i'm sure he'd appreciate anything i make so yep! I'm pretty glad i made this belated Vday thing. I feel it's more special when you make any other odinary day 'feel' special rather than cracking your brains over the most unusual thing on vday itself. Somehow, it doesn't feel as special since you're ALREADY expecting something. That's just my opinion. plus, vday is so over-hyped in Singapore. zzz

to D:
thanks for always being there to tolerate my nonsense. I know i do behave unreasonably sometimes (as i hate to admit) but thank you for always putting up with it. I hope your patience lasts =X though somehow i feel it thinning =XXX hahaha. Well, more importantly, thanks for all the little efforts you always try to make to spend time with me (despite crazy work), bake with me, cook for me, buy things for me etc etc and the list goes on.

Lastly, I really hope we both can grow in Him and i guess nothing beats a happy relationship as long you get your priorities right =)

Happy belated V day!

p/s: i hope the cake's yummy!

Back to business. This cake is made of up 3 layers of really soft and moist chocolate cake sandwiched with 2 layers of chocolate whipped cream and strawberries and covered in a layer of ganache. Speaking of ganache, it was really watery, yes, watery! I made a mess trying to pour it over, next time, i'm gonna put it in the fridge to let it set a little more before pouring it. I had a little issues with the ganache as it didnt cover the sides nicely. It keeps exposing bits of the whipped cream. booo =( i also think the cream was slightly overwhipped? *shurgs*

I figured it'd be a really simple cake to put together. just grab chocolate cake recipes you like, whip up some chocolate cream and sandwich it with some fruits you like and pour ganache over!

So, won't be posting any recipe here, unless someone requests for it =)

Have a good day!

Wednesday, February 25, 2009

ribena marble cheesecake

Saw this beautiful cake by HHB and told myself i HAD to try it. My friend had lotsa cream cheese left over and she suggested that i could get them from her since she wouldn't be using them.

Got her to take a look at HHB's cake and she wanted me to make one for her. HHB omitted the jelly topping step since she thought it's gonna cover up the beautiful marble swirls and indeed it does! I actually tried making those swirls (which is now hidden below the jelly layer) and obviously it not visible anymore.

Pardon the really lousy photos. My house's lighting is terrible and it was "too bright" the swirls can't be seen properly and the jelly keeps reflecting the light big time. *roar*

After an attempt on Rei's strawberry cheesecake with the gorgeous design, i decided to do something similar, that is, to play around with the jelly topping and cheesecake using various shapes. After experimenting the other time, things went on more smoothly this time and yep! Ready for more desgins!

Sorry, no pics of innards as this was, as promised, a request for my friend, SJ. I hope you like it!


Ribena Marble Cheesecake

Ingredients

crust:
150g digestive biscuits, finely crushed
60g butter, melted
[I found the base too thick, so i'm gonna reduce it to 120g digestive biscuits with 40g melted butter]


filling:
100ml water
20g (2 tablespoons) gelatin granules/powder
250g cream cheese, soften at room temperature
75g caster sugar
250ml (1 cup) natural plain yogurt
75ml Ribena blackcurrant juice cordial


topping:
100ml water
2 teaspoons gelatin granules/powder
80ml Ribena blackcurrant juice cordial


Method:
Line the sides of a 18-20cm round pan (with a removable base) with parchment paper or clear plastic sheet (I cut out a strip of plastic sheet from a cookie bag), set aside. [i just used a 7" cake ring with a 8" cake base as i intended to give it away. if not, a 7" cake ring on a flat plate would work perfect too. that is if you don't have a springform or cake pan with a removable base]

To make the crust, combine crushed digestive biscuits and melted butter together in a mixing bowl. With the back of a spoon, press the biscuit crumbs onto the base of the prepared pan. Chill in the freezer compartment for at least 1 hour. (To ensure the crust is even, I used the base of a flat-bottom glass to press down the crumbs.) [i let it chill about 30min in the fridge. still worked]


Filling:
Measure water into a bowl and sprinkle in the gelatin (without stirring with a spoon). Set aside to allow the gelatin grains to swell (10 mins) before setting the bowl over a pot of simmering hot water. Stir with a spoon and once the gelatin melts, remove the bowl from the pot and set aside to cool to room temperature. [its important to allow the granules to swell and they indeed melt much easier and faster after "swelling"]

With an electric mixer, beat cream cheese and sugar together until smooth. Add in the gelatin solution and yogurt, beat till the mixture turns smooth.

Divide mixture evenly into two bowls (about 1 cup each). Add 75ml of Ribena into one of the bowls and mix well with a spatula.

Spoon the two mixtures in alternate blobs into the chilled crust. Level top and swirl with a knife through the mixture to create a marble effect. Refrigerate until set. [i didn't have to level the top, it just somehow came together] see here!


Topping:
Measure water into a bowl and sprinkle in the gelatin. Set aside to allow the gelatin grains to swell (10 mins) before setting the bowl over a pot of simmering hot water. Stir with a spoon and once the gelatin melts, remove bowl from the pot and stir in 80ml of Ribena. Set aside to cool.

When completely cooled, pour mixture over the cheesecake and chill for several hours or overnight until set.

*it is important to allow the cheesecake to set before pouring the jelly topping. Also, when pouring the jelly topping, do be gently. If possible, spoon the jelly mixture. This it to prevent the pressure of the jelly mixture from "eroding" your cheescake. In which, you might end up with floating bits of cheese

adapted from happyhomebaking

Tuesday, February 24, 2009

back log

made this banana chiffon some time ago, on valentine's day to be exact =p the bumch of over-riped banans were just beckoning me to make a banana chiffon. Was too tired/busy after baking it so didn't write a post on it.

I was really really pleased with how the cake turned out. probably one of my best chiffons ever. the cake rose high in the oven and well, still shrunk and i thought it could be taller. I'm satisfied for now as it shrank to just the height of the pan, which is by far, the highest i ever achieved. it always shrinks to below the height of the pan.
This time, Ive used a smaller chiffon tin (17cm one) and needless to say, the cake was really light and fluffy. =) My mum said the banana taste could be stronger though she really liked the texture. But i thought chiffons were supposed to be just lightly flavoured? no?

I got this recipe from happyhomebaking
Banana Chiffon
Ingredients(make one 16 ~ 18 cm cake)
3 egg yolks
25g caster sugar
1/8 teaspoon salt
30ml cooking oil (I used olive oil) [i used corn oil]
85g banana puree (about 2 medium size bananas)
1/4 teaspoon banana essence (I used vanilla extract)
55g plain flour
1/8 teaspoon baking soda
3 egg whites
1/4 teaspoon cream of tartar
50g caster sugar
Method:
1.Preheat oven to 170 degC. Sieve together flour and baking soda, set aside. Mash banana, set aside.
2.Separate egg yolks/whites and bring to room temperature.
3.Whisk egg yolks and sugar in a mixing bowl until sugar just dissolved. Add in salt, oil, essence and mashed banana. Whisk till combined. Sieve over the flour mixture and fold gently with a spatula until flour is fully incorporated into the batter.
4.In a clean, dry mixing bowl, whisk egg whites and cream of tartar with an electric mixer until mixture becomes frothy and foamy. Add in the sugar in 3 separate additions while beating at high speed till stiff peaks form.
5.Add the egg white foam into the egg yolk batter in 3 separate additions, each time folding gently with a spatula until just blended.
6.Pour batter into a 16cm or 18cm (6 inch or 7 inch) tube pan (do not grease the pan). Spread and smooth the batter evenly with a spatula. Bang the pan gently on a work surface several times to release the air bubbles trapped in the batter.
7.Bake for 25 ~ 30mins or until the cake surface turns golden brown, and a skewer inserted into the centre comes out clean.
8.Remove from the oven and invert the pan immediately. Let cool completely before unmould.
Recipe source: adapted from Chiffon Cake is Done by Kevin Chai

Monday, February 23, 2009

ang koo kueh

A traditional must-have during a child's first month celebration, commonly know as 满月. Not too sure what it symbolises though, but red is usually used in happy occasions like in weddings and all. ang koo kueh literally means "red tortise kueh". traditionally made in a mould with the shape of a tortise shell.

I came across Amanda's blog while searching for the japanese cheesecake recipe and saw that she used her mooncake moulds to make these kueh. I found it really rather interesting and thought they looked really pretty! Since I've also got those moulds, why not try them?
Im pretty pleased with how the skin turned out and i thought it remained soft even when it was cooled and not oily like what's sold outside. (i guess that's cos i didnt brush it with oil after i steamed it) But, i guess D begged to differ and thought it had a teeny weeny of crust on the edges.. hmmm..
It was my maiden attempt at these kinda things so I just wanted to prepare a fast, easy filling. Peanut filling. Didn't turn out too well though =( not too sure if it was because i used already sweetened ground peanuts or because of the sesame..

I didn't have red colouring on hand, so i just used the closest, rose pink but added LOTS of it. It doesn't look as red as what's sold, but i guess im pretty happy with the turn out =)

Ang Koo Kueh
Ingredients:
Sweet Potato Skin:
200 g sweet potatoes
300 g glutinous rice flour
2 tbsps oil160 ml water
Some red coloring (optional)
Mung Bean Filling:
200g yellow split mung beans (soaked until soft)
80g - 100 g castor sugar
½ tsp salt
2 tbsps oil
1/4 - 1/2 cup diced shallots
Water
Method:
Sweet Potato Skin:
Steam the sweet potatoes until soft.
In a bowl, mash the sweet potatoes with a fork. Add glutinous rice, oil and water and mix well to obtain a smooth dough. Cover with a damp cloth and leave aside. You can add a little more water if the dough is too dry.
Mung Bean Filling: [I did not make this filling and used peanut filling instead]
Steam the yellow split mung beans until soft. Mash with a fork.
In a non-stick wok, fry the diced onions in oil. Leave aside to cool.
In a bowl, mix the mashed split peas, salt, fried onions, oil and enough water to form a soft dough.
Shaping the Ang Koo Kueh:
1. Brush the ang koo kueh mould with a little oil to ease removal of the kueh from the mould.
2. Take a small lump of sweet potato dough and using your palm or a rolling pin, flatten it, into a round shape with the centre thicker than the sides.
3. Spoon some pea filling into the dough, pinch the sides of the dough together, and using the palm of your hand, roll it into a ball.
4. Press the ball into the mould firmly, to obtain the design and shape of the mould. Tap the mould gently on the table to remove the ang koo kueh from the mould.
5. Place the ang koo kueh on a square piece of oiled banana leaf.
6. When all the ang koo kuehs are shaped, steam them in a wok over high fire for 3 minutes covered. After 3 minutes, remove the cover to release steam, then re-cover and steam for another 3 minutes over a medium fire, until the kuehs are cooked. [i used a electric steamer and steamed for 10 minutes]
7.Remove the kuehs from the wok and brush them with a little oil to prevent them from sticking to each other. Serve when cool. [i forgot to brush with oil and they were indeed a little sticky]
Notes:If you don't like the mung beans, you can use peanuts or red beans filling.I used about 26g pastry and 19g filling. [i followed her porptions for dough:filling. The mould i'm using is 4.6cm in diameter]
*I made using half the recipe with the same dough:filling proportions and ended up with 13 pieces.
adapted from Florence

success or failure?

I've been wanting to try out this japanese soft cotton cheesecake for the longest time as far as i can remember. I finally got to try it today and well..i'm not sure if i should classify it as a success or a failure *shrugs*

taste-wise: it was fantastice with a subtle yet distinct lemoney taste complimenting the cream cheese without being overly cheesy

appearance-wise: a total eye-sore with the almost black top =(( plus, wrinkly sides which were a result of the cake shrinking. disappointed

The recipe called for beating the egg whites till soft peaks. i read somewhere that it is important not to beat it till stiff peaks as it will cause the cake to shrink rapidly upon removal from the oven as it (egg whites) can't hold up the weight of the cream cheese mixture. That's probably exactly where i went wrong..the peaks were somewhere between a soft and stiff..so..probably the reason why it shrank.

the over-zealous me removed the cake from the pan almost immediately and the moment i removed the parchment, it shranked and "aged" (formed wrinkles). I guess i should have left it in the oven for a while, cooled it in the pan for a while before removing it from the pan =(

grumbles aside, my sister loved the cake and as i type now, 3/4 of it are gone! success or failure? you decide =p
Japanese cheescake
Ingredients:
140g sugar
6 egg whites
6 egg yolks
1/4 tsp cream of tartar
50g butter
250g cream cheese
100ml fresh milk
1tbsp lemon juice
60g cake flour
20g corn flour
1/4 tsp salt
Method:
1. melt cream cheese, milk and butter over double boiler. Cool mixture. I would recommend cutting the butter and cream cheese into small blocks so that it melts more evenly and faster. make sure the cream cheese is melted with no lumps. stir it smooth before removing to cool.
2. fold in flour, corn flour, egg yolks, salt and lemon juice. Mix well. you don't have to be too gentle here, just stir to imcorporate the items to form a smooth batter.
3. whisk egg whites with cream of tartar till foamy. Add in sugar and whisk till soft peaks form.
4.Add the cheese mixture to the egg white mixture and mix well. Pour into a 8-inch round cake pan (Lightly grease and line the bottom and sides of the pan with greaseproof baking paper or parchment paper).
5.Bake cheesecake in a water bath for 1 hour 10 minutes or until set and golden brown at 160 degrees C.
6. when done, leave in oven for 10 min. Remove from oven and cool in cake tin for 10 min before unmoulding cake.
adapted from amanda

Saturday, February 14, 2009

happy valentine's!

Wishing everyone a happy valentine's!

Strawberry cheesecake


yes yes yes, I know i mentioned i'd be away for a short break. But my itchy fingers can't stop from touching any baking related items.

I fell in love with Rei's strawberries cheesecake and has ever since been cracking my head over how she arrived at such a ingenious design. She was kind enough to post the recipe.

I found the recipe interesting as I've never really came across any no-bake cheesecake that requires the addition of whipped cream. Upon further reading (of the post), I realised that the recipe was originally from Florence who made a mango version of it.

After weeks or maybe months of pondering over how the design might have been done, I finally tried out this cake. Firstly, it was a no-bake, so I figured things would be simpler than a baked one. Secondly, korean strawberries were going at $2.95 per punnet in giant. Plus, D was craving for some, so I just jumped at the chance to make them. haha. Thirdly, I have a packet of cream cheese lying at home which came in really handy. Fourthly, i have all the ingredients ready, at home. i just had to try it.

So off i went, preparing the things and all.
As seen from the picture, obviously i did such a terribly job as compared to Rei's which was so so so beautiful and professionally done! Despite having thought extremely hard on how the design might be achieved and made all the precautions and etc before embarking on this try-out, i still screwed up!

Firstly, the batter could not fill up to cover the line strawberries. probably because i didnt use a full 200ml whipping cream. Secondly, I wasted more batter while fiddling and trying to make the pattern. So, what you see is the final amount of batter i managed to "save". Hence, the protruding strawberries at the side. =(((

Nonetheless, I'm still really really glad i managed something somewhere near Rei's strawberries cheesecake. More room for improvement! Taste-wise, it had a really rich strawberry taste that isn't too overpowering with evident taste of the cream cheese. Not too cheesy, light and nice!

Today, my brother's classmates came over to borrow the kitchen to bake a cake. I must say they're pretty daring to embark on a fully frosted cake without much baking background =XX I wasn't home to see if they screw up my baking utensils and all but when i came home, the cake was pretty much nicely frosted.

A little accident happened, but we still managed the cake onto the cake board. Upon realising it was off center and judging by the enormous amount of frosting left, I suggested to pipe words. I must say the girl who piped the words did a really nice job!

I remembered having a box of heart sprinklers and so, I offered them and suggested to sprinkle it all over the cake to liven up the otherwise dull, plain looking cake. They were all really happy with the outcome and i'm happy that they're happy. =p
I've no verdict on the taste, thought i think it's still acceptable for a first-time-try-out.

p.s. my brother came to tell me proudly that HE was the one who frosted the sides. I was pretty impressed cos it was pretty presentable for a first time. After exchanging a few sentences, he told me he actually "learnt" how to do it when he saw me doing the cartoon cakes previously. Pretty proud of him, a really quick learner but super lazy!

that's all for now, and i really hope i manage to concentrate on studying!!!! =XX

Monday, February 9, 2009

an edible handbag?


Another fun-filled cake decorating workshop by Anna from sugar inc cakes. Made this cute little handbag cake during class when it came in real handy as i went to attend my niece's birthday party. I hope she liked the cake!

This was a velvety chocolate cake (real soft and moist) sandwiched with swiss meringue white chocolate buttercream and covered and decorated with fondant =)

It was surprisingly easy and not as difficult as I thought it would be. Just a personal opinion, I thought it was much more easier compared to the cartoon cakes workshop actually.

This is something i would definitely make again and again, as long as there are requests for it. =) Fondant is really nice and easy to work with and really simple to make it yourself.

Really happy and satisfied with the outcome! I've always feared making fondant covered cakes as they always seem like such a huge project to me and all. But after this lesson, it is really not as difficult as you think it is. I'm glad, really glad i went for this class =D Thank you Anna!

Sunday, February 8, 2009

a short break..

Quite a self-explanatory post title..yes..gonna have to take a short break soon with all the mid-term tests and CAs coming up..

As much as i dream eat sleep baking, i've gotta fix my grades and get it going for the last sem! Yay!!

So..i hope to be back baking soon while i try my best at studying hard!

wish me luck!

Saturday, February 7, 2009

using up my egg whites part V: macarons


Another macaron attempt to finish using up my egg whites and of course, to improve on my macaron skills.
I'm am still not satisfied with the attempt this time round although it did not crack at all - not a single one, had nice high feet - every single one of them, but they had air pockets!

I have no idea why, but this has ALWAYS been a problem whenever i do the french meringue method. I remember leaving a comment on tartelette's blog about air pocket issues. She mentioned that it might be due to one to many folds, right between the perfect and seriously overfolded stage. What puzzles me is the super high feet which is a sign on underfolding..hmm. However, she did mention to ensure that i tap the tray before letting it dry out, which i so totally didn't do for the fear the the batter would spread =X maybe i really should have tapped the trays.

These small round things were really sweet as always and i probably would give up making these since my mum keeps complaining about how sweet and unhealthy and how this is really bad to make and eat etc etc.. oh wells..I wouldn't consider this a horrible attempt, just hoping that the airpockets disappears! or that i'd be able to find out what exactly went wrong and then, i think i'd be pretty much satisfied with everything else =)

[update]: As much as i complain and rant about my not-so-satisfactory attempt, a friend just really made my day and commented how well baked it is =D Thank you ZW! I'm glad you and your friends liked it =))

Posted by Picasa

Thursday, February 5, 2009

a breakthrough!

I have always heard about how difficult is to bake a chiffon and have to agree it isn't easy at all! This is actually my second attempt at a chiffon cake. I tried a pandan chiffon cake just yesterday and it was a total flop. The possible disasters just kinda happened all in one attempt. The sides caved in, making it look like some "hour glass" cake, the bottom was wet and oily, liquid oozed out while it was cooling, it shranked like crazy after i got it out other oven and sigh..it was SO disappointing i didn't even bother to try taking pictures.

No high hopes today, just hoping it holds it structure, no caving in and no rapid shrinking. Thought of making a orange chiffon instead as i didn't wanna go through the trouble of preparing the pandan juice and ended up with a cake in the bin. A slight accident still happened while unmoulding the cake. I forgot to loosen the middle core and eagerly loosened the bottom and the bottom (which is now the top) kinda got teared off. I managed the picture when i carefully removed the torn portion and placed it over the "crater".

I would definitely have to work on it and improve. The texture of the cake is great and so is the flavour =) subtle yet present and gives of a light refreshing taste. Definitely very citrus-y!
However, much have to be done in perfecting it's outlook and making sure this wasn't a i-just-got-lucky attempt =p

Got the recipe from Rei who provided a SUPER good and detailed write up on chiffon cakes and trouble-shooting chiffon-related problems.

Orange Chiffon Cake

Ingredients

(A)
4 egg yolks
30g castor sugar
1/4 tsp salt40g corn oil
140g orange juice
Zest of 1 orange

(B)
120g Cake flour
1/2 tbsp Baking powder

*Sift 2x

(C)
5 egg whites
40g castor sugar
1/2 tsp Cream of Tartar

Method

1) In a bowl, using hand whisk, whisk yolks and sugar till sugar dissolves.
2) Add oil and salt, whisk and add orange juice and zest. Stir well.
3) Fold in sifted flour and mix well.
4) In another bowl, using an electric mixer, beat till the whites are frothy. Add in Cream of Tartar and beat till soft peaks.
5) Add in sugar gradually and beat till stiff peaks.
6) Fold in 1/3 of the whites into the yolk mixture using a rubber spatula till incorporated.
7) Pour the mixture to the remaining egg whites and fold in gently till incorporated.
8) Pour the batter into a 21cm chiffon tube pan. Bang the pan on the table to get rid of bubbles.
9) Oil a piece of aluminium foil and cover the pan loosely. Bake at 170 deg.C for 10mins.
10) Turn down the temperature to 160 deg.C and bake for 10mins. Lift up the foil to check the surface of cake, bake for another 10mins.
11) Insert a skewer to check if cake is done. Remove the foil and reduce the temperature to 150 deg.C and bake for a further 5 to 10mins to brown the surface.
12) Remove from the oven and invert the pan. Remove the cake from pan when it's completely cooled.

adapted from Rei

*Rei mentioned that she's using an oven which the fan cannot be turned off. I did not follow her baking instructions/timing. I baked at 170C for 50 min.
*i did not check the doneness with a skewer. (for the fear that open and closing the oven causes large temperature fluctuations.

Do take a look at Rei's entries on chiffon tips they're really good!
Posted by Picasa

Wednesday, February 4, 2009

using up my egg whites part IV: Lavender Angel Food Cake

Another attempt at baking angel food cakes. Not a successful attempt definitely, but a HUGE improvement from the previous one. This time, i had enough to fill up 3 moulds nicely, no more volcanic eruptions and nicely browned top.
I sorta knew what went wrong the first time judging on this time's results.
1. the batter was highly highly overmixed. which also explains why i could only fill up 2 tins.
2. the egg whites were most likely a little overbeaten
However, having said all that, the results this time was not satisfying at all! The insides were still little tough, though much better than the first.
Troubleshooting the cause has led me to 2 conclusions:
1. slightly overbeaten egg white leading to,
2. slightly overmixed batter
This is one important "realisation" for me. the "batter" is unlike anything that we're (or normal, novice bakers which ever you wanna put it) familiar with. not like a normal cake batter, nor like any muffin/cupcake/pancake/etc etc batter.
essentially, it very much looks like the beaten egg whites! i.e. not much change when you fold in the flour. therefore, it is super important that the whites are beaten to perfection! smooth, yet stiff and glossy and not stiff, and dry. stiff but dry peaks kinda make folding in the flour pretty tough and end up with a blotchy "batter".
The cake was soft on the outside, but yielding a very very slight chewy texture on the inside. For more details on troubleshooting angel food cake, please refer here.

A pretty extensive write up on angel food cakes can be found in the link given above. Almost everything essential to know when baking one.

I hope i can master it soon..

Monday, February 2, 2009

using up my egg whites part III: milk-tea angel food cake

Saw the post by bakingfiend on Lavendar angel food cake and immediately decided i should try it out. the ingredients looked simple enough. Just egg whites, flour and sugar (and lavendar of course). A little apprehensive, as it's my maiden attempt at angel food cakes. i haven't even attempted a chiffon before!
Intended to follow her recipe exactly coupled with the fact that i have a packet of dried lavendar sitting in the cupboard. However, i recalled me not liking the taste of lavendar very much, it felt like i was eating soap! Decided against it for the fear i would have to chuck the cakes in the bin.
Popped by daiso to get those cute little moulds. was eyeing it for quite sometime but didn't have a proper recipe/ need to buy it. now i've got a valid excuse =p
I looked around the kitchen for something to replace the flowers and finally settled on instant milk tea. primarily because, 1. upon reading up on other blogs, milo chiffon not a very pleasant effect. 2. there wasn't any instant coffee left at home. so, since there was instant milk tea, i just settled with it.
The original recipe mentioned that it fits 3 small moulds nicely. However, I only managed to fill 2 moulds up. (i filled it about 80% full based on my reading up on chiffons and assumed the same for angel food cakes) The cake rose well in the oven, it rose and rose and rose too high that it started cracking all over! it was like a huat kueh instead! =X

I guess i have filled too much batter into the tin. The funny thing is, the batter at the sides don't rise very high, not as much as the middle. hmmm...
The cake unmould pretty easily and nicely. very satisfied with the outlook. but =X it was a little tough, the feeling of a overmixed cake batter. I suspect i might have over whipped the egg whites till it was too stiff to be folded with ease into the flour. i spend quite sometime trying to incorporate the egg whites and had to leave as it is though there were still some bits here and there.

Taste-wise, the tea taste came through not too over-powering and rather subtle. A tinge of bitterness lingered after a while. Texture wise, it was really poor and i would not want to really eat a cake like that =( Therefore, won't be posting the recipe here.
I think i should try out with a proper chiffon recipe some day and see how things goes.

using up my egg whites part II: light butter cake

I'm hoping that from the post titles that you might be expecting a series of bakes/recipes involving egg whites. I've mentioned in the previous post that i'm desperately trying to use up my egg whites before i toss them into the bin.

It's funny how i've been franctically searching recipes that uses only egg whites and not realising i have one just right at home! it's a butter cake recipe using egg whites only, perfect. I baked it twice as cupcakes (that's the so-called original recipe). However, it also makes a 6" round cake.
Having tried it out as cupcakes, i thought, why not try it out as a cake this time. I went ahead, preparing the ingredients and all, the recipe was a breeze. total 1 min and 30 sec mixing time only.

I was told that it'd probably take 25 to 30 min to bake in a 6" tin. so i waited and waited, the top browned, it rose a little, so far so good. 25th min came, took it out to test. guess wat? the top was all nicely browned and all, yet the cake was still wobbly! obviously not done. repeated this for the 30th, 35th, 40th.....and finally it was only done on the 50th min! ?!?!

by then, the top had cracked badlyyyy =( fortunately, the cake came out nicely, but, only 4cm tall. (not including the dome) zzz

waited for it to cool off and slice of the dome. my! the crust was THICK and HARD. =X however, despite the hard crust, the insides was really moist. the cake was a little too sweet in my opinion, so i shall try to reduce the sugar in future.

a really really fragrant butter cake indeed. I can't really remember how did the cupcakes i did turned out before, but this recipe is definitely a keeper, with minor adjusments to be made of course (i.e. baking time)

I'm hoping to try out aunty yochana's white butter cake recipe soon and do a comparison with this one. i hope...

Sunday, February 1, 2009

using up my egg whites part I: swirly macarons

After some kueh lapis and pineapple tarts, im sure many others who attempted those common cny goodies face the same problem as me - many leftover egg whites!

The only thing i thought of was macarons, since those are the only things i knew used egg whites only. Upon surfing the net and reading up on other food blogs, i realised that there are much more recipes that uses egg whites only.

For a start, i still did macarons, for a simple reason, i hadn't experimented enough with it and since i have spare egg whites, why not make use of the opportunity? This time, i'm sticking back with the french meringue method. The italian meringue method experiment left me with sticky pots and perspiration all over (due to the boiling of the sugar syrup). The french meringue was sooo much simpler and yielded better results.

Once again, i used the recipe i did for the french meringue method i did, adding a little twist to it, thanks to Tartelette who inspired me to try out what she did.

it was abit of a frenzy, trying to separate out some batter and add colouring to the remaining ones and..i might over-mixed the colour batter in the process =X or rather, i might have mixed correctly, but, due to the fear of over-mixing, i had streaks of coloured powder they weren't incorporated carefully enough.

my first fear was removed when i saw those pretty feet bubbling away..however...the tops cracked all overrrrr. =((( brrr

I had extra plain batter left, and realised the consistency was much thicker and might be less overmixed den the blue ones. so i piped 4 of them, yes just 4 of the plain ones just for the sake of comparison. and boy, was i glad i piped the plain ones.

2 trays of blue ones and ALL had cracked surface. I began wondering why. 1. i left them out to dry. so i don't think it's because of the skin-forming problem. 2. i had an oven thermometer and the temp was kept under control. 3. ah ha! the cracked parts were on portions that the colouring streaked! hmm..so was it or was it not the colouring? the answer could only be solved by checking out how did the plain ones fare.

ta da! the plain ones look great! thought i thought they were a little under-mixed. the feet looked a little to big and tended to spread more outwards than the blue ones. nonetheless, i'm pretty happy with the outcome as the feet did not spread so much outwards like my first french meringue attempt.
The bottoms of most came off beatutifully, but the plain ones had sticky bottoms that left their bellies/insides on the parchment paper. =( maybe because they weren't cooled enough before i removed them or...?
conclusion:
1. i might just stick to the french meringue method for good, seeing how easy and that it works fine for me.
2. if only the blue colouring was evenly mixed, i might have just ended up with pretty looking macarons.
3. no more blue macarons for me, they look abit too coloured to be eaten. though, really pretty to look at.
4. i quite like the recipe as somehow, it didnt taste as overly sweet as the ones made with the italian meringue method.
5. **something to improve, the macarons were a little too crunchy on the sides. like biscuits. hmm..that i'll have to troubleshoot over again.
Related Posts with Thumbnails