Monday, August 31, 2009

Mooncakes Part I

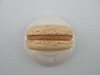
I made my very first mooncakes last Mid-autumn festival and that experience taught me alot. I even tried cooking my own lotus paste. Somehow, I couldn't get it to taste like those you buy outside. =( This year, to start off some simple mooncake experiments, I decided to buy a packet of White Lotus paste from Sun Lik while I re-stocked some cake-making items for an order. To my surprise, the paste tasted really good! It wasn't too sweet and still retained the paste's fragrance. Not too oily either. =))

I was pretty psyched to start my mooncake making experiments so I refered, once again, to Aunty Yochana's blog for some mooncake recipes. I remember using her baked mooncake recipe last year but forgot how long i baked it for. I couldn't follow the temperature and timing stated in her recipe as I made smaller mooncakes. Speaking of which, I finally used the mooncake moulds I ordered from Elyn last year to good use! And they were REALLY easy and GOOD to use. The imprints were SUPER clear and stayed clear even after baking. I vaguely remember that when I was using those old-fashioned wooden moulds last year, the imprints were good before baking but were all blur and "smudged" when out of the oven. So, I was really really happy and glad with the result this time. HOWEVER, the mooncakes came out of the oven like a ROCK. seriously. It was like...HARD biscuits. Naturally I'd think I over-baked it.

Although I read up on various bookes and websites that baked mooncaked have to go through a "maturity" period for the oil that's in the skin to seep back in which will soften the skin. Again, vaguely remembering that aunty yochana's recipe need not this "process". So, was really pretty upset about the mini-experiment. Since I wasn't desperate to gobble up the moocakes, at least not in that rock-hard state, I decided to let them "mature"....

2 days later...

The skin is now soft! And they tasted like mooncakes! HA~ D gave it a thumbs up and my sister who tried the rock-hard one, now said this scores 100 points! haha..must be the vast difference in texture that led her to such an exaggerated score. =p

Although I used ~33% weight for the pastry and ~66% for the filling, my mum said the skin a little thick. But I like thick skin lehh (though i'm NOT thick skin)..okok bad joke.. in any case, I'll probably try 25% pastry or something, if my pastry wrapping skills allows me. =XX

More experiments coming my way!

*No pictures of the whole mooncake cos D happily gobbled 3 out of the 5 left. (I thought he took pictures of the whole mooncake). Now, there's only 1 left.

Friday, August 28, 2009

Gribbit!

Pardon me for the quality of the photos. My mum's gone for a holiday and so has the lucky camera. Hence, this picture was taken with my sister's iphone, which, I unfortunately is such a noob in taking photos with it.

Another order, by a uni classmate, Nick. He asked if I could do a "Keroppi" cake for someone whom he doesn't wish to disclose to me. *heh heh* must be for a girl lah. I obviously agreed right? No insides of the cake for obvious reasons. It's a simple chocolate sponge cake with cookies 'n' cream filling, frosted with non-dairy whipped cream. He requested the picture to be decorated with piping jelly. It was really simple and i loved the effect except for the not so perfect eyes =( I wanted to pipe a shell border, but thought it'd make the cake very "old fashion" looking. So I piped a bead border with the shell method. The tip was a little too huge and my poor piping skills showed. sigh..Nonetheless, I hope nick doesn't mind and the lucky girl would be impressed =p
A close up on the cute cute frog, Keroppi!

Wednesday, August 26, 2009

ah goo goooo...


Anna had just recently gave birth to her second little prince, Dermott. I was pleased to have received her order for baby shower cookies. I belive it's pretty common to give out cookies as baby shower favours in the West, but not here in Singapore. It was a pretty novel idea and i was glad, because that means i can use many pretty and cute cookie cutters.

Each box contained 10 cookies, with a total of 30 boxes. Each box include, letters: "B" "A" "B" "Y", a milk bottle, rocking horse, rattle, baby pram, teddy bear and a small little ducky.

Too bad I didn't manage to capture any photos as I was too engrossed in finish baking, packing and sending it off. A little tired, but glad that I managed to pull it off on time.

If you've been quite an avid baker, you'd realise the lack of pretty packing here in Singapore and so when I was searching high and low for a suitable box, I pretty much gave up and decided to "customised" the boxes myself.

I printed a "baby themed" border and paste it around the boxes together with a personalised cute label, with Dermott's face! =D The baby themed border took me a while as I vectored each and every baby-related item and coloured it with photoshop to avoid infringing copyright laws. But I was really pleased with how the box turned out. Unfortunately, the pictures of the boxes is all i've got for this huge cookie project..I shall wait and see if Anna's got any pictures to offer =)


update: Anna has very very kindly sent me the photos of the cookies and I've uploaded them! =) Thanks alot Anna! =DD

Thursday, August 13, 2009

rich and creamy

If there's anything I learnt about blogging, it is never to procrastinate. I had meant to post this up earlier and when I finally got down to taking the photos, half the cake was gone! That explains my one and only photo I have here. I'd like to think it's a blessing in disguise as I managed to have some fun with photo editing websites.


I had been wanting to try out this durian cheesecake recipe ever since I saw it here. As usual, I procrastinated till the day came my block of cream cheese threatened to jump right into the bin. No reason why I'd let a block of yummy cream cheese go to waste right?


The durian cheesecake was quite a new twist to the usual cheesecakes we're used too. Durian being the king of fruits practically overwhlems any other flavours that it is combined with. If you'd taste very very carefully, you might be able to taste the super duper mild, faint taste of cream cheese. A pretty nice durian dessert =) I'd say...perfect for a nice and simple, rich and tasty birthday cake. Sprinkle the top with some cocoa powder, pipe some whipped cream rosettes and top it off with a "happy birthday" sign, don't you think it's just pure elegance? haha~


If you look closely, you'd realise the "topping" layer. I might very well do away with the topping the next time round i attempt this cake. Not that it isn't nice, but the amount of durian in this cake is TOO evident that the topping only served to cover up MORE of the cheese taste. BUT but but, the topping seemed really really similar to 榴莲糕. Like those you get at some shops in one block like a "sweet" kind of thing? Either that, or I might have overbaked the topping layer.


Nevertheless, it still tasted great. Warning weight watchers, this is so NOT the dessert for you. Cream cheese + Durian = lethal calories combo. But then again, how much harm would a tiny slice do? hehe..


I halved the original recipe and baked it in a 6" pan instead. Timing and temperature was based on pure estimation and I guess timing really depends on what kind of texture you're looking for. I remember reading somewhere that for a more dense texture, baked it longer. For a softer, more moist texture, don't bake it as long. (don't quote me on this though for i'm no cheesecake expert)


durian cheescake recipe
makes one 6" cake


Ingredients:

Base:
140 gm Digestives Biscuit - Crushed finely
55 gm Butter , melted and cooled

Filling:
175 gm. Durian Meat - mashed finely
250 gm. Cream cheese - softened at room temp.
60 gm. sugar
20 gm. cornflour
90 gm. evaporated milk
50 gm. whipping cream
1.5 eggs (beaten)

Topping:
80 gm. Durian Meat
33 gm. fresh milk
23 gm. whipping cream
15 gm. sugar
1/2 whole egg + 1/2 egg yolk

Method:

(1) Mix all the biscuit base ingredients together and press into a 6" springform tin. Chill in the refrigerator while preparing the filling.
(2) Blend durian flesh together with evaporated milk until smooth. Leave aside. Cream cream cheese and sugar till well combined. Add in corn flour followed by the rest of the ingredients. Mix till smooth.
(3) Pour cream cheese durian mixture onto the chilled biscuit base and then steam bake at 160C for about 50-55 min.
(4) Blend the topping ingredients together until smooth and pour on top of the hot baked cheese cake. Bake for about 10-15 mins.
(5) Turn off the oven and allow cheesecake to cool in the oven with door ajar for ~30 min. Remove from oven and leave to cool on a cooling rack. Chill for at least 4 - 5 hours before serving.
(6) Sieve some cocoa powder on top before serving. (I omitted this)

recipe notes:
1. I did not use a springform pan. I used a pan with removable base. Make sure the pan is well wrapped to prevent the water from the water bath from seeping in.
2. To unmould the cheesecake, wrap the sides of the pan with a hot towel for about 10-20 seconds and run a hot knife around it and unmould.
3. I wrapped the romovable base with aluminium foil for easy release of the cake.

Enjoy!

Monday, August 10, 2009

All pretty in pink!

It's Phi's 3rd birthday and Ian's mummy (which obviously is also Phi's mummy) asked if I could make a doll cake for her. I haven't attempted a doll cake before as there were simply no occasions for me to embark on such experiments! haha~

If you are one who quite as crazy as me about cakes and cake decorating (in some sense), I'm sure you'd have come across a doll cake. These cakes are usually pretty tall and "big" in order to fit in barbie's never-ending long legs. So, after exchanging a few questions and answers with regards to the details of the cake, Ian's mummy was looking for a doll probably with a garden as a "background". So I thought, that'd be pretty nice..Without thinking much, I agreed.

After giving it a little thought, I realised it seemed like a pretty difficult theme to match. A doll cake itself would be pretty large and with a large doll on a small patch of "grass". hmmm...looks a little weird and wrong.

So after much research and looking around online for inspiration, I finally settled on what you saw in the picture earlier one. I reduced the doll size by ALOT. to the point, the skirt was the size of a cupcake, shaped to look like a dress. I made a "castle" to go with the Princess and of course, a carriage to complete the princess theme =).

It was my first try in embarking on such a huge assignment that I wondered then and now, during the process of making the cake, if I actually made a wrong decision by wanting to add in tons of details. =X I finally convinced myself that if i do not try it now, I wouldn't know when will I next get the chance to.

It was my FIRST making a doll cake.
my FIRST making a carriage. (I had no idea how to)

But praise God, He gave me the wisdom to figure them out somehow. Everything on the cake is edible except for the 3 little crystals that I've stuck on to the tiara and of course, the doll itself. The carriage, the castle and the 2 towers are all cakes draped in fondant.

As mentioned earlier, the skirt/dress is sculpted from a cupcake. As for the castle towers, they were cupcakes that were trimmed to fit the ice cream cones. I baked the "carriage cake" in 2 bowls and trimmed them to fit together and formed a carriage. (not as round and nice as I'd have liked it, but this would suffice for a first try)

A close-up on the details. There were alot more minor details that I'd have wanted to add on, but due to miscalculations and pure laziness and procrastination, I didn't managed to make the cake exactly how I envisioned it to be. Still, I received nice reviews about the design. Heng arh.

Of course I'd like the cake to taste nicer, but I've yet to find a very yummy chocolate cake that is heavy and "sturdy" enough for fondant covered cakes. Well, the search goes on...

I recently bought quite a few cookie cutters and was estatic to realise that my tiara cookie cutters could be used! I though it'd be just perfect and fitting with the theme. hehe..
Ian's mummy didn't request for this and I meant it as a surprise. After all, they could be doubled-up as birthday cookie favours or a small little party pack for the other kids right?
Although it isn't my first time using royal icing to decorate cookies, my previous attempt was incomplete. So I was never really able to have a real feel how should I go about decorating cookies. Whatever knowledge I had about cookie decoration was from the internet. Thanks for flickr.com, I manage to find some inspiration as to how I should decorate the tiaras. I very much wanted to personalise each cookie by writing the guests names, but i didn't know who would be going! Yet, I couldn't ask as it was meant to be a surprise. So I ended up writing "Phi" on every cookie instead.
I packed it in whatever favour bags I had. Things wouldn't be complete without a nice little gift tag. So I made a really simple one to go along and am pretty pleased with it =p hehe. I hope everyone liked it. Only 1 complaint! I realise the cookies go soft after flooding it with the royal icing and I got pretty upset. The cookies were nice, crunchy and buttery. But after flooding, they turned soft, though still nice and yummy nonetheless. Anyone knows why?
I baked a total of 29 cookies but some broke under my rough handling and so here's some of them, waiting to be dried and packed.

Here's a close-up on the design. I varied very very little amongst the cookies and here's one of the designs. (actually they all look about the same ha~) I'm glad I didn't give up the thought of baking the cookies. I finally got to decorate fully with royal icing and boy! was it fun and really simple. =DD
I didn't get a chance to attend the party but I really hope Phi enjoyed herself. Happy Belated 3rd Birthday Princess Phi!!


Sunday, August 9, 2009

simple and good

I was supposed to post this up a longg while ago but the lazy bones in me prevented me from doing so. It's so long that I kinda forgot what I wanted to include in this post. bahh..

I titled this post "simple and good" for obvious reasons. It's always nice to get back to the basics and bake good'ol cookies and cupcakes after ploughing through with all the fanciful cakes.

My brother actually requested for this chewy chocolate chip cookies. While I remember the recipe being really simple and quick, I was apprehensive with how the cookies would turn out. After all, the skill with baking chewy cookies are the temperature and accurate timing. Pull them out too soon and they'd be too soft, pull them out too late and they become crispy. =S

I've used Anna's recipe (subscribe here!) for the chewy cookies and I must say they were really pretty good. What I love about cookies are that you could flavour it any way you like it! Don't like nuts? Omit them! Love more chocolate? Up the choc chips! Love a little citrus kick to it? Add some orange or lemon zest. Looking for something colourful? Add some M&Ms. See? The combinations are endless. 
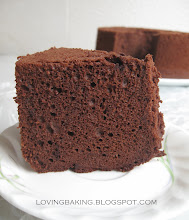
These cookie dough yielded cookies approximately the size of those at subway. Having said that, it wasn't as successful an attempt as my previous one but still nice, crispy on the edges and chewy in the middle. I'd have liked it a little more chewy though. So you see, I must have either baked it too long or at too high a temperature.
Nonetheless, the gooey choc chips dispersed amongst the cookie made up for everything. How wrong can chocolate go? The colour was great and not overly sweet. YUM!
Next up! CUPCAKES! If you noticed, I mentioned having to bake 210 cupcakes for an order. I was terribly upset with the way those 210 cupcakes turned out and am really glad that the people who ordered were alright with it. *phew*
Feeling indignant about it, I decided to try it out again. The same problem persisted, but manifested in a smaller scale. Maybe I haven't got to know my oven well enough. Yikes! The recipe I used yields 16 cupcakes. With so many cupcakes, I intended to flavour some so that it wouldn't be so boring to eat 16 cupcakes of the same flavour. Being the forgetful me, I happily filled the 12-hole muffin pan and popped it in the oven. Only to realise after 5 mins that they were ALL plain! I had intended to flavour them with some piped strawberry jam on top and some others with sprinkled chocolate chips. Sigh..I was only left with 4. So I went with chocolate chips with all 4 since the bag of chocolate chips were already sitting on the kitchen counter.


The cupcakes definitely tasted as good, with a slight improvement in the appearance. Great for snack, decorating and dessert! Despite it being a pound cake recipe, the cake was still soft and fluffy and more importantly, moist!
Again, this recipe was taken from Anna and it can be found in her book. This recipe is also featured on a TV program aired a while ago on channel 8. Hop on over here to get the recipe! (episode 7)
Simplicity.

Related Posts with Thumbnails