I had seen a shrinky before many years back, probably when I was 8 or 9. It was one of those cool things I saw at a funfair/pushcart stall of some sort. Pardon me, as my memory is a little fuzzy.
And so, when I saw that this shrinky thingy was available in Daiso via this Daiso FB group (this group is addictive, you've been warned) I thought I really need to try this out someday.
In a twist of events, I had a set courtesy of a friend. Yippee! No need to make a trip down and search high and low for it. So I kept it, with eagerness and anxiety not knowing how it would turn out. I really looked forward to use it as an activity with G.
I finally decided on a whim, no plans beforehand, to make this as a "gift" for papa's birthday which is next week. I had to, of course resist, "helping" out with his art work as it would have to be as original as possible, no? Maybe it was my fault, being too anxious, I didn't quite explain to him what was going to happen. Ok, maybe because I didn't quite know how exactly it would come up to anyway.
Anyway, I had him draw on the sheet, whatever he liked (and phew! He didn't meltdown at the fact the mistakes can't be erased.) And I finished off with "happy birthday papa" and his name and the year.
The whole shrinking process was quite nerve wrecking as I was as clueless as G and could only explain based on the instructions behind the sheet (which were in Japanese, so I relied on the pictures) and the verbal instructions my friend had given when she handed me this set.
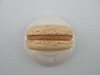
It was pretty cool seeing how it curled up and shrank and opened up again.
Of course, G was really proud of it that he wanted to give it to papa today and made papa hang it on his house keys. :p


.jpg)