
.JPG)
FINALLY! After some 70 pineapples, 13 blocks of unsalted butter, 4 packets of plain flour, some custard powder and milk powder, D and I finally managed to finish the daunting task of baking close to 1000 pineapple tarts, tangerine style.
I intended to and was supposed to open the new year goodies for sale officially. However, the 3 orders that came along the way proved impossible to take on anymore additional orders. You see, I had previously baked a batch for D to bring to office as a sample, for his colleagues to taste test. I don't know if it was good or bad, but news travelled quite far and some colleagues whom never tasted it actually daringly place an order. So, there was a total of 13 tubs of pineapple tarts, 48 tarts in each tub.
Additionally, the sight of us making pineapple tarts day in day out, night in night out probably tempted my mum to actually order 10 small tubs (24 tarts each) and 2 tubs. Yes, my mum actually did order it from me. She actually paid me.
.JPG)
.JPG)
Baking non-stop for a week after work was no easy task. Especially since, yours truly, needs sleep the most. I ended up sleeping at 1plus, 2 in the morning for almost the whole of January and I'm truly hoping for some good rest during this CNY break!
I tried using ready made paste for the taste-test batch, but the ready made filling only proved too dry and a serious lack of real pineapple taste. Oh! and did I mentione, it was a tad too sweet. Sweet + no pineapple tang = no-go.
I nearly fainted at the thought of having to slave over the hot stove cooking pineapple filling enough for 1000 pineapple tarts! That was just insane. BUT,thank God for microwave invention. I vaguely recalled coming across SeaDragon's blog which showed a way to microwave pineapple filling. And boy! I immediately jumped at doing so! *click here*
I only used his guide for the first time I was doing it, but after getting used to the microwave, I changed the timing and learnt how to judge the doneness and knowing how much longer to cook it for.
As a rough guide, to be on the safe side, microwave your grate/blended pineapples on HIGH for 10 min first, take it out and give it a stir. Pop it back in for another 10 min and thereafter only go at 5min intervals. The doneness of the pineapple filling depends on how moist/dry you like your filling to be. Of course, the moister it is, the shorter the shelf life. The drier is it, well you know, the less tasty it is. But whatever it is, homemade filling is definitely better especially since you could control the amount of sugar!
For me, I added ~45-55g of sugar per pineapple depending on sweet or sour the pineapple began with. Oh! and be sure to drain the pineapple of the juice, this helps ALOT in speeding up the cooking process. OF course, you could leave the juice ALL in, but it'd just take a much longer time to cook, a much long time for the juice to evaporate and dry up the paste.
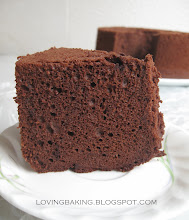
I have modified the recipe I used for last year's pineapple tarts and found that the addition of milk powder gave the tarts an exceptional fragrance and the addition of custard powder gave the pastry a nice yellow colour. I'm not sure if it contributed to the pastry's texture, but they sure were melt-in-the-mouth. YUMS!
So, without further a-do, here's my version of pineapple tarts - tangerine style for this year! =) Enjoy!
Pineapple Tarts - Tangerine Style
Makes approx. 60 tarts
Ingredients:
A:
180g Unsalted butter, cold and cubed
B:
240g Plain Flour, sifted
100g Icing Sugar, sifted
1 Tbsp Custard Powder
2 Tbsp Milk Powder
1/4 tsp Salt
*Mix well*
C:
1 Egg yolk
1/4 tsp Pure Vanilla Extract
*mix well*
Egg Glaze:
1 egg yolk + some water to dilute
Method:
1. Rub A into B until the mixture resembles breadcrumbs.
2. Add in C and mix until a soft dough forms.
3. Measure out leveled 1/2 tablespoonefuls of dough and roll them into balls and set aside.
4. Measure out 1 leveled teaspoon of pineapple filling, rolled into balls and set aside.
5. Pre-heat the oven to 190C.
6. Flatten the prepared dough and wrap the pineapple filling in. Place the completed tart into small paper cases (or directly onto baking tray).
7. Bake in pre-heated oven for 6 min. Take out tray and brush on egg glaze and return to the oven for a further 6 min.
8. Allow the tarts to cool completely before storing.


.jpg)


4 comments:
Walao!! Now I feel so embarrassed!! Yours are THE REAL McCoy, man!!
恭喜發財!!恭祝您在這虎年里能夠發大財、行大運!!
Hi Youfei,
Wow! No wonder you were so "breathless"! So many pineapple tarts to bake, and having to juggle your work too! Nonetheless, it was worth all the efforts when the tarts turned out so beautifully done!
Here's wishing you a happy new year, and a happy valentine's day too!
Hey Pei-Lin!!
Err no lahhhh....yours are real good too lehh.. Don't make me feel pai seh laa haha!
恭祝你万事如意, 心想事成!
Hi Jane!
haha well! I feel like i'm really whiny..You have work too and you have your kids to coach yet you still manage so many bakes AND photos! Impressed! =)
Happy Valentines Day to you too!
新年快乐!
How long did you take to finish cooking your pineapple filling??
Post a Comment