 I'll have to admit that this blog post title is a little mis-leading. There's only one kind of cookie flavour featured here. BUTTER COOKIES. Its funny how we're usually more pre-occupied with the "pro" stuff that we come to realised we don't even have a good, basic recipe.
Fortunately for the invention of the World Wide Web, I don't have to rack my brains and squint my eyes all the way through shelves and shelves of books in the library for tried and tested good recipes. I fell back on the ever reliable HHB for the recipe of yummy, easy butter cookies.
The recipe was a breeze and the recommended way of rolling and cutting it out was brilliant. i loved it. It was time for the taste test. And.. it passed with flying colours under the examination of my younger sister and her friends' taste-buds. Not to forget, my brother as well. I actually did the first batch earlier, but without any high expectations. (as i had terrible experiences with cut-out cookies previously) Hence, no pictures of the first batch.
 Not to mention, what's the fun in butter cookies when you don't decorate them! Many people start of baking with the simple stuff like cookies and decorating cookies. Ashamed of myself, I've never ever decorated a cookie before! So, whipping out my meringue powder, i made some royal icing. Thanks to the great tutorial here, I managed to grope my way around decorating cookies a little better. Here's just part I. The outline. I'm praying hard that the flooding succeeds and hopefully you'd get to see the end-result soon!
*I added cocoa powder to the royal icing to get a dark shade for the outline instead of trying to get it tinted black. (it's an experiment anyway =p)
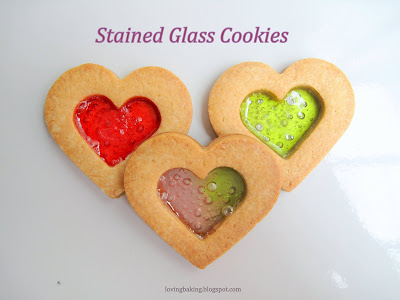
 Up next! Stained glass cookies. Do a quick search and I'm sure you'd find many people having attempted stained glass cookies. They're such a beauty, but I'm afraid I spoiled them =S The sweets bubbled like crazy in the oven and now they all look bubbly and "hole-ly". I comforted myself and well, isn't that a new cool design? HA~
To save resources, in case this fails, I only experiment on 3 cookies. Yes, 3 only. All the cookies above came from the same batch of dough. I figured that the temperature was too high for the sweets to melt nice and evenly, so I'm gonna try it a a lower temperature in future. Until I succeed...
 Here's an attempt to see the "transparency", stained glass effect. Sad to say, I think the bubbles are obstructing that view. sigh. Till then..
 Here's an attempt to see the "transparency", stained glass effect. Sad to say, I think the bubbles are obstructing that view. sigh. Till then..
Here's the recipe used for the butter cookies, with a tiny admendment and that is, the addition of pure vanilla extract.
Vanilla butter cookies (makes ~20 cut out cookies about 3" in diameter)
Vanilla butter cookies (makes ~20 cut out cookies about 3" in diameter)
Ingredients:
100g butter, softened at room temperature
80g caster sugar
1 tsp pure vanilla extract
1 egg yolk
180g cake flour
20g corn flour
Method:
1.Sift cake flour and corn flour together and set aside. Line baking tray with parchment paper, set aside.
2.With an electric mixer, add in sugar to the butter in 2 ~3 additions and cream till the mixture turns pale and fluffy.
3. Add in egg yolk and vanilla and mix well.
4. Add sifted flour mixture in 2 ~ 3 additions, stir with a spatula to form a soft dough.
2.With an electric mixer, add in sugar to the butter in 2 ~3 additions and cream till the mixture turns pale and fluffy.
3. Add in egg yolk and vanilla and mix well.
4. Add sifted flour mixture in 2 ~ 3 additions, stir with a spatula to form a soft dough.
5. Place dough in a plastic bag and flatten with rolling pin. Refrigerate the dough for about half an hour.
6. Remove dough from fridge. Roll out dough on slightly floured work surface and cut out with slightly floured cookie cutters. If the dough appears to be a little to hard and breaks into pieces while rolling, leave it at room temperature for a few minutes. The dough will soften up and can be rolled easily.
7. Bake at pre-heated oven at 180 degC for 15 mins.
8. Let cool and store in air-tight container.
*I placed a ball of dough in those big transparent plastic bags (people used to put bao/curry puff/etc) and rolled the dough. This way, the you have a less messy work space and need not flour the work surface or rolling pin.
*I rolled the dough to about 1/4" thick.
*Do flour the cookie cutters lightly as it will help release the cut-out dough easier.
*I split the dough into smaller mounds and rolled it in several plastic bags. That way, the dough won't soften up too much/fast. You can work on each dough slowly without worrying the dough softening and having to refrigerate it again.
*gather the scraps and roll them out again until you finish using the dough.
recipe adapted from HHB


.jpg)


8 comments:
Hi Youfei,
You're into cookies now ya? Very nice moulds you've got for your cookies. The stained glass cookies with the bubbles looks very nice actually! It has its own character leh! I bought a packet of fox sweets from Gina last 2 weeks, but yet to try them yet! :p
Thanks for sharing the recipes.
Hi Jane,
It's another one of those procrastinated experiments..haha..
I've been wanting to do these ever since Anna posted on her cookies that were going to be on television. =p I even bought the meringue powder a good half a year ago. Lukily it hasn't expired. =X
Thanks for your compliments on the stained glass cookies. hehe.. Try it soon! and let me know how it goes yea? =p
regards,
youfei
Hey Fiona, the bubbly effect is actually quite nice coz it's evenly bubbly - kinda artistic - I like it leh!
Hi Anna,
haha! Guess it's a mistake turned out good!
Heh! The hello kitty cookies are so pretty.
hey!
yea! I think so too. Though I'm not so much of a hello kitty fan, I do find it pretty nice and cute.
These cookies are really easy and presentable for a little girl's birthday party door-gift or some sort. Can you imgaine those cookies packed individually with a ribbon and tag. haha! nice!
Hi, I just happened to stumble upon your blog. Looking at your recipe, to bake the cookies at 180 degrees and 15 mins is indeed too long. The reason why you have bubbles in your stained glass is becos your melted candies were bubbling away. To avoid this, you may wish to cut down baking time to 6 or 8 mins. Max 10. The cookies should not brown so that the stained glass effect would look nicest.
Cheers!
Hi Anonymous,
thanks for your advice!
Actually, I half bake the cookies first before adding the sweets and only baked it in the oven for 5 min..I have since modified the recipe and it looks good now! =)
hmm maybe you're right about the cookies not browning. But pale cookies gives me a "uncooked" feeling.. =p
many thanks for your advice!!
Post a Comment