Tuesday, June 30, 2009

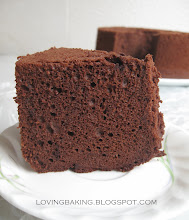
double chocolate chip chiffon cake

Pardon me for the lack of posts recently. I've been baking, still, but not as much, not as often. Somehow getting real lazy after my holiday trip. Plus I've been doing certain experiments along the way, which I figured wouldn't be appropriate to be posted up here online.

I nearly gave up on this post as well when the cake slipped right out of the pan not long after I overturned it. For some reason, I decided to go ahead and take photos after realised how tall the cake had been. I'm pretty sure it slipped out due to underbaking. Plus, it shrank a little on the sides. A quick check on Rei's Chiffon "handbook" left me concluding that the egg whites were probably a little over-beaten.

Furthermore, I probably did not do a good job mixing and all the chocolate chips ended up at the bottom (now, after overturning, becomes the top)

Nonetheless, the texture was great except for the not so nice appearance. Itching to try out this recipe? follow me here!

Friday, June 5, 2009

another try

another try at the recipe I've posted previously. This time, I decided to bake it in a smaller pan and following the original recipe to the T. that is, a pure, simple, butter cake.

The original recipe called for baking in an 8" cake pan. I thought to myself, since it would be some sort of an experiment/try-out, I decided to half the recipe and bake it in a 6" cake pan. This way, less ingredients used, less damage to my wallet + waistline. Sounds pretty good huh?

This time, I managed to whip the egg whites to soft peaks stage (or so i THINK it is the correct soft peak stage). My oven played tricks on me and the temperature was really not what it was supposed to be. As a result, the cake split open at the top while the interior was still underbaked. =X

It really turned out to be an experiment of some sort as I had no idea how long should I have baked it for. I'm still in the midst of figuring out my oven's temperment (big sigh) and wondering if my oven thermometer is calling for a retirement soon. (I dropped it once, and i'm not unsure if it functions as well as before)

Whatever factor it was, the cake turned out pleasing, soft and fluffy, moist and buttery. I felt, however, that there was a tinge of sugar overdose in there. *shrugs*

p.s: comparing to the butter cake I had at some hotel, i can safely say, I like mine alot better. I think D has to agree on this..right? haha!

Yummy Butter Cake

Ingredients:
125 gm. Butter
50 gm. Sugar
1/2 tsp. Vanilla Essence
45 gm. Egg Yolk
1-1/2 Tbsp. Evaporated milk
100 gm. Cake flour
2.5 gm. Baking powder (about 1/2 tsp)
a pinch of salt
80 gm. Egg White
50 gm. Sugar

Method:
(1) Grease a 6” cake tin. Preheat oven to 180C. Beat butter, margarine, sugar, salt and vanilla essence until light and creamy.
(2) Add in the egg yolk one at a time and beat until creamy. Add in evaporated milk.
(3) Fold in sieved cake flour and baking powder.
(4) Whisk egg white and sugar to soft peaks and fold gently into the creamed butter mixture. You can fold in 1/3 of the egg whites first to lighten the creamed butter mixture followed by the rest of the egg whites.
(5) Bake cake for 1 hour in oven at 180 deg.C or when the skewer comes clean. Turn the cake onto wire rack to cool.

adapted from aunty yochana

Some tips..
1. Do not over/under cream butter sugar mixture. Over creaming results in a cake with a sunken center. Under creaming results in a dense, heavy cake
2. Do not over/under bake. Over baking results in a badly cracked, dry cake or cake that shrinks upon cooling resulting in a cake with less volume. Under baking results in a heavy, wet cake.
3. Turn over the cake immediately after removing from the oven to prevent it from sinking and shrinking from the sides.

Tuesday, June 2, 2009

crazy me

What set out to be an attempt of nice little chicken pies turned out wayy wayy different.

My sister was asked to bring food along for a "picnic" cum birthday celebration of our new friends, a cute German/Hungarian couple who are here in Singapore for 2 weeks to spend their Honeymoon. Sweet huh..

The initial plan was to bake some yoghurt cupcakes (Anna's recipe), which was super fast and simple, but most importantly, super yummy. Somehow, things got evolved to making normal egg tarts with shortcrust pastry. However, I decided that I would probably try my hand at chicken pie and test out a puff pastry recipe which i once made like eons ago. Coming to the puff pastry recipe, I attempted it probably like almost 2 or 3 years ago, using pastry magarine at that time. The pastry rose so beautifully in the oven, it could easily pass off as pastries sold by Polar puffs and cake. Serious. This time, I decided to be more adventurous and use butter instead. Bad Choice. Wrong Move.

As you know, the weather here in Singapore has been pretty quirky and annoying lately. It's be sooo hot and warm, you probably can't survive without the invention of the air-conditioner. So, trying to be smart, I made sure the butter was rock hard, super cold. I thought to myself, that'd probably do the trick and avoid running into gooey, oily, melting butter when I roll out the dough. Wrong. The butter was so hard, I could not roll it! So, I tried to incoporate it by using my rolling pin and banging it into the dough. The nice "envelope" package I made gave way as the edges of the hard butter poked through the dough as if it was eager to return to the hot humid weather outside. I scrambled to patch up the holes and made do with whatever I could. Onwards, things went alright, but not the best i expected. (this was becuase I rolled the dough as lightly and gently as I could. ) Come the time I needed to roll it out thinly to cut out the shapes, I knew I couldn't run away anymore. As expected, the dough busted at the corners and edges and slabs of butter oozed out. Heck! I had to make do with what I had.

Bearing in mind that you gotta let the dough rest in between turns, my conversation with my sister spiralled and i ended up making portuguese egg tarts. From cupcakes, to normal shortcrust egg tarts, to chicken pie and alas! portuguese egg tarts. What a pair of indecisive sisters. Zzz

My previous attempt at portuguese egg tarts turned out horrid! Goodness knows why I picked that recipe (probably becuase of the picture). It involved grated cheese! yes! grated cheese in the egg custard filling. Yuck! it taste nothing, i emphasize nothing like a normal egg tart, much less being able to pass off as a portuguese egg tart. Feeling defeated and lousy after that attempt, I don't know where I got that courage to decide on a portuguese egg tart filling in 15 mins. Yes, you guessed it, I was browsing thru the web for recipes while waiting for the dough to rest in between turns.

Now back to the puff pastry dough, it was soft, oily and buttery. BUT, as i cut through the dough i could still see some layers and prayed hard they'd work. A few tests, and it came out o...k.. Not like perfect, nice puffs, but it did puff up and taste good. Just that, they looked horrid. So now, came the real test. Combination of my last minute found portuguese egg custard filling recipe + not so successful puff pastry. And...

It huffed and puffed in the oven with the VERY uneven, ugly, cut-out pastry sides with the super pale egg custard filling :S which almost looks white. In the end....

This was what I ended up with. I must say I was really pleased! (except for the appearance)
Signature brown spots (checked!)
Crispy puff pastry (checked!)
The only thing left, was the taste test. I'm suffering from huge ulcers, so I had to get my sister to test it. It passed the test! The pastry was fragrant, crispy (ok maybe a little too crispy) and flaky. The custard was cooked just right and tasted like portuguese egg tarts (quoting my sister)
And so, I rushed to prepare more egg custard filling. (remember that was a trial?) Lo and behold, my sister told me there might be more people and asked if i prepared enough tarts. YIKES! what now?! So I told her, i'll try preparing MORE tarts, but the normal shortcrust ones. It was IMPOSSIBLE to do another puff pastry. Too bad, I was too slow and inefficient, I had to make do with whatever amount of tarts I had.

Feeling annoyed, I decided to make more egg tarts! pandan ones to be exact. I made these tarts before, during my exams and didn't have time to snap picture and blog about them. Those tarts looked better, there were a much brighter green and looked darker. I was really not pleased at all with how the colours turned out this time but oh well! no one to blame except me! I added too much water to blend with the pandan leaves as a result, the colours were far lighter than it should have been. Not to despair, these tarts were super fragrant, bursting with pandan flavour =)
In fact, while taking the pictures, I kind of liked how the pastel effect of the green turned out. Feels like a perfect little afternoon tea treat. With nice cold tea. hot tea doesn't go lah..the weather so hot. bahhh..
This pandan egg tart recipe is taken from aunty yochana. The previous time, I attempted it with the crust recipe here. This time, I decided to use the crust recipe here instead. It turned out that the first was a little more fragrant and buttery and softer. The second one was a little hard, but still nice and edible. =)
*Update (03/06/09): Tried out the crust recipe from the pandan egg tart recipe here again yesterday and can safely say, this crust recipe is a definite keeper! Just remember not to make the crust too thin, or your tart might crumble before it reaches your mouth. Tried out this crust recipe with another egg custard recipe which is yummy, easy and super smooth. Will post the recipe when I've perfected the sugar content and bake timings.

Despite the tarts being a little hard (which I suspect might have been overbaked), the egg custard was still fragrant nice and smooth. =) I still need to improve on my moulding skills. But, I blame it on me being tired after standing in the kitchen for almost the whole day. heh..

I love this picture! Doesn't it just reflect a super relaxed, nice afternoon tea treat? hahaha! Me and my tai-tai dreams again =ppp
Do try out these tarts if you can afford the time! They're relatively easy to put together, just a little effort in moulding the dough into the tart. These are definitely something you can make to impress! Special home-made, unique-flavoured, pandan egg tarts. =D

Friday, May 29, 2009

steamy goodness

I finally tried out the much raved steamed moist chocolate cake recipe. It was super easy to put together and of course, a healthier alternative. Or so i think it is =p
The only problem I had was that the cake was pretty short. Less than 2" tall, 1.8" to be exact. (yes, i measured it) =( Plus, I had many small little holes on the surface of the cake AND the center was taller in the middle than the side! I did cover it with foil. But I'm not sure if it is considered covered "loosely". What I did was just to place the foil over the cake tin. No wrapping no anything. Just to make sure the surface was covered.
Anyone who tried out this recipe before knows what went wrong?
For those who want to have a hand at it, it can be found here! Apparently, this recipe was originally from Dralion from a forum, Kitchen Capers. It has TONS of good and raving reviews.
Having said that and rambling and complaning, the cake was good. if you don't have an oven, fret not! no baking experience, doesn't matter! no baking gadgets, no mixer, no "special" bowls, not an issue!!
As long as you have a steamer (no steamer also nvm, just use a big wok), large spoon and a big bowl, you're in for a treat! oh! I forgot, you do need to sift the flour. IF you really want to get a flour sifter, just get one at Daiso, $2 only, quite a bargain, isn't it?
Happy steaming!

Tuesday, May 19, 2009

another workshop by Anna!

After the handbag cake workshop, Anna finally opened a class teaching simple 2 tiered cakes upon many requests! yipee! To me, it was a must go! I believe the skills and techniques learnt at Anna's workshops will last you your baking lifetime i would say. =p

I was really really looking forward to this workshop, but come the day, i was kinda tired and felt a little sluggish to go for class. But! but! the class didn't disappointment as usual and i lurvvvee the orange, cinammon cake Anna provided as a recipe. PLUS! i finally got to meet Jane from passionate about baking! well, that was the main reason why i got all excited about the workshop too! She's a really lovely lady, very warming, enthusiastic and very very easy to get along with. I'm glad to have joined the class else, I wouldn't be able to have meet Jane =D

I didn't do a good job taking all the pictures. But here they are, all the beauties lined up! My camera not as pro, just a normal point and shoot, so i couldn't zoom it, just had to break them up in order to see the details of each and every beautiful cake =D I really love these 2 cakes! they look so, girly, elegant and soothing.


Here's Jane's cake on the right which looked simple and classy to me. The colours, in my opinion were a really good match. I could have not though of such unique combinations!


The previous picture didn't capture the top of Jane's cake, so I hope this picture did some justice to her cake. The blue one is Philia's cake, owner of blogshop Ophilia.Treats. =)


And this, is mine =p I was deciding between putting on fondant cut-out flowers or using the beautiful, elegant stencils Anna had. The stencils looked like something to be mastered and i wasn't prepared to potentially destroy my pink cake =p And do, since i already had the flowers cut out, i decided to go ahead. But, i had another problem, how do i stick them on? The other ladies were really quick and creative and their cakes left me amazed! And so, I went back toying on the stencil idea. I finally decided on making a design of cascading flowers, which, wasn't that easy either. Putting the flowers at certain angles, to make them look random and flowing out from the top, proved a challenge with my not-so-artistic flare =S


Anyhow, THAT's the cake i ended up with. And I'm pretty satisfied with it. Except for the bare backside. But the other ladies and Anna convinced me it's supposed to look like that, elegant and simple. haha~


It's Anna's last workshop for now as she goes off for a break awating the delivery of her second boy! Congrats Anna and do have a great rest!! =))

Thanks Jane! Here's the picture you sent me! Thanks alot!! My camera not pro enough =p I have also been toying with the idea of getting a DSLR, but my lousy photography skills would just put the good camera specs to waste!

Thanks Jane once again!

Saturday, May 16, 2009

15.05

I cheated on the post dates hehe..I kinda rushed to finish up the cake, cos I procrastinated throughout the week. bad me. haha..

So anyway, I saw a video from howdini.com again and saw this castle cake and changed it to suit a boy's birthday =) And of course, i jumped at the chance to bake a birthday cake for jed's fourth birthday! =DD

The picture was courtesy of Kane. I was kinda at a loss at how to decorate the cake. The video said to put sugar cubes for the ridges on the wall. but..yuck! sugar cubes? so I tried replacing them with loacker wafers covered in dark chocolate cream. oh! yea, the cake was a 7" orange pound cake (which i modified from rei's chocolate pound cake recipe) sandwiched with dark chocolate pastry cream (which I too from Dorie Greenspan's baking: from my home to yours). The video showed to roll the ice cream cones in sanding sugar..i went..sugar again??? So since I was on a orange-chocolate theme, I went ahead and replaced the sanding sugar with chocolate rice!

I personally wasn't too satisfied with the outcome. I thought it could have looked better. oh well, i'm jus glad that jed's mummy said he looked happy and proud of his cake =D Someone commented the cake being a little hard, but i'm not sure if its because it was chilled. But then again, the cake had very fine grains, just like the condensed milk pound cake. so..hmm..i'm not sure either. *shrugs*

So, I won't be posting the varied version of orange pound cake now, until I get satisfied reviews about it. Do let me know however if you really want it. I can post it all the same =)

I do have to agree that the swiss meringue buttercream was SUPER sweet. I lost my swiss meringue buttercream recipe i used for ian's birthday so i had to use some that i found online. Only to find out the the sugar amount was ahem too much. apologies everyone!

HAPPY BIRTHDAY JED!

Thursday, May 14, 2009

Japanese Souffle Cheesecake

Not too sure how many have been reading this blog neither am I sure if those who read remember me mentioning about attempting a few new and some old recipes but was too lazy to take pictures and blog about them? (pardon the super long sentence) Well, this is one of those I've tried along the way.

The previous attempt left me upset about the texture and appearance. Although it tasted good, it wasn't something I was looking out for or expecting it to be. This time, I saw on Pei Lin's flickr that she tried out this "Japanese Souffle Cheesecake". Sounds gorgeous already doesn't it? haha.

Apparently, this recipe is THE one that I'm looking out for. It has ZERO gluten as corn flour is used in place of any other kind of flour and it's creamy texture it's enhanced even more by the addition of very fattening whipping cream. yikes! what a unhealthy dessert isn't it? Before you change your mind about making this, let me first tell you, this isn't your normal typical cafe-type dense, creamy cheesecake that gets you so sick of cheese you just want to vomit. nope! this isn't. Well, if you're guessing then that this is the kind of cheesecake you get from BreadTalk for 8.90 (in an oval shape) or Fiesta (for dunno how much) then bingo you're right on!

Despite it's super high fat content, this cheesecake as it name suggests (souffle) is really light and creamy which, yes, literally melts in your mouth. With the addition of lemon zest and hint of lemon juice really makes this cake a pleasant afternoon treat!

Before I go on and on about the cake non-stop, let me get on with the recipe. I got this recipe, with Pei Lin's recommendation, from this blog.

The only complaint I have now is the appearance of the cake. The edges are slanted and I have zero idea why. Does anyone out there happen to know?

Without further ado, here's the recipe:

Japanese soufflé cheesecake

[Ingredients]
250g cream cheese
200ml thickened cream (35% milkfat)
40g cornflour
4 egg yolks
75g caster sugar
Finely grated zest from 1 lemon
4 egg whites
75g caster sugar

[preparation]
1. Preheat oven to 150C. Grease a 20cm round cake tin and line bottom with baking paper.
2. Dissolve cream cheese with thickened cream in a bowl placed over simmering water (or in a double-boiler). Remove from heat. Whisk until smooth. Cool slightly.
3. Beat egg yolks with caster sugar, lemon zest and juice. Gradually whisk the warm cheese mixture into the yolk mixture. Fold in cornflour.
4. Beat egg whites until foamy with uniform tiny bubbles. Gradually beat in caster sugar, spoonful by spoonful, until firm but not to stiff peaks stage.
5. Fold 1/3 of the meringue into the cheese mixture. Repeat two more times with the rest of the meringue.
6. Pour batter into the prepared tin. Place the cake tin in a deep roasting tray and fill the tray with hot water to halfway up the sides of the cake tin.
7. Bake for slightly over an hour. Let cool completely before turning out. If the cake is hard to turn out, assist it by placing the tin over warm water briefly.

*note: size of egg is 60g (with shell)

adapted from cafe of the east
Related Posts with Thumbnails