
ok..this was something really spontaneous. I had attempted butter cakes sometime ago in between my "mini hitiaus" but was just too lazy to take pics and post about them. Besides, they were nothing fantastic. Plus, I was upset that i couldn't even handle butter cakes.
speaking of how did I arrive at wanting to make butter cakes, Ian's grandma was asking me at the party if I made butter cakes and if i did how do I make it etc etc..And it struck to me that "hey! you haven't even attempted a simple butter cake!". She asked of a trusted recipe, if i had one, and so of course, I went home and made a search for it. I remember reading from Rei's blog about some marble cake she made to be given away as gifts for her son's first month celebration. Which received RAVE reviews and that she cited her recipe back to aunty yochana's butter cake. So, that's how it all started.
The recipe couldn't look any simpler BUT when I attempted, it
failed. it was still edible nonetheless, but i seemed to have encountered
all the problems other readers left on the comments section for aunty yochana's post! how devasting right? =( k, that aside, it left me worried, restless, and 不甘心. Everything felt weird right from the start, perhaps I underestimated the recipe and overestimated my abilities. Aunty yochana's recipe uses the egg separation method which is supposed to work wonderfully! (just like a chiffon right, so i thought it should be a breeze since i succeeded at chiffons before, but no, i did not.)
1. everything went well with creaming butter and sugar and adding in eggs. trouble started when i added in the flour. it literally became a
dough.2. Recipe stated to whip whites to soft peaks. I underwhiped and it totally had no effect on lightening the "dough" mixture.
3.the batter ended up like a pancake/waffle batter. Zzz.
4.that spelled D-I-S-A-S-T-E-R
5. cake rose, and CRACKED.
6. i had the "bubbles" problem all over the cake surface.
The second attempt went on much much better, i whipped the egg whites longer, and the butter/egg mixture was much workable, and this time, it resembled a cake batter. however, i left the cake to cool in the pan (as I was rushing for school and wasn't sure if i should cool it or remove it). When I was back from school. the cake shrank from the sides and in height. though i thought the cake was gonna be some dense pound cake, it did not! haha..and boy was I glad my mum polished off by bringing it to her friends for some gathering hehe!
so after those 2 attempts, I couldn't consider myself having succeeded with this supposedly darn good recipe.
 After a chat over msn with Ian's mummy and passing her the links to the recipe, i convinced myself that yes, now's the time to try it again. So this time, i did a marble cake. I've always loved marble cakes and always wanted to bake them. I'm aware of how simple it is actually to obtain those lovely marbles but have just not gotten around to making it. So, everything went well, batter looked right, and marbling was pretty =)
horror started when i removed the foil that i used to tent the cake. saw that bare patch? sigh. it ripped off the "skin" which bore the great marble design. shade! (which is what the Germans would say) so, i totally wouldn't have known how the marbling would have turned out right? wrong! there was a tiny speck which wasn't affect by the foil and i could see remnents of how it would have been. So, I just had to look at that small patch and imagine it on the whole cake =X
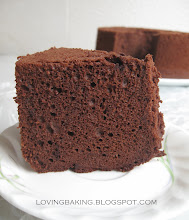
 Thank goodness the interior of the cake was ok, not the prettiest i've seen, but still passable lah.. yea? =p The cake was soft, light and not crazily oily.
I happened to come across a baking book bought long ago which had quite detailed write-ups on chiffon/sponge/butter cake methods and tips.
Before I get real naggy, lemme first post this really good recipe =) (with a few slight modifications of my own)
Ingredients:250 gm. Butter
80 gm. Sugar
1 tsp. Vanilla Essence
90 gm. Egg Yolk
2 Tbsp. Evaporated milk
200 gm. Cake flour
5 gm. Baking powder (about 1 tsp)
a pinch of salt
160 gm. Egg White
100 gm. Sugar
1 tbsp Cocoa Powder (sifted)
2 tbsp Evaporated Milk
*Mix thoroughly, warm up the milk if you find the cocoa powder difficult to dissolve
Method:(1) Grease an 8” cake tin. Preheat oven to 180C. Beat butter, margarine, sugar, salt and vanilla essence until light and creamy.
(2) Add in the egg yolk one at a time and beat until creamy. Add in evaporated milk.
(3) Fold in sieved cake flour and baking powder.
(4) Whisk egg white and sugar to soft peaks and fold gently into the creamed butter mixture. You can fold in 1/3 of the egg whites first to lighten the creamed butter mixture followed by the rest of the egg whites.
(5) Spoon about half of the mixture into a separate bowl. Add in the cocoa mixture and stir well.
(6) Drop alternate spoonfuls of mixtures into an 8" round pan. Use a chopstick to pull backwards and forward through the mixture.
(7) Bake cake for 1 hour in oven at 180 deg.C or when the skewer comes clean. Turn the cake onto wire rack to cool. *I tent the cake with foil from the start of baking and remove it towards the last 10 minutes of so for the surface to brown. Oil the foil to prevent the batter from sticky to the foil.
adapted from
Rei and
aunty yochana Some tips..
1. Do not over/under cream butter sugar mixture. Over creaming results in a cake with a sunken center. Under creaming results in a dense, heavy cake
2. Do not over/under bake. Over baking results in a badly cracked, dry cake or cake that shrinks upon cooling resulting in a cake with less volume. Under baking results in a heavy, wet cake.
3. personally, i find that it is ok whipping the egg whites to stiff peaks and i prefer to do so. instead of soft peaks.
update: whipping the egg whites till stiff may make the cake dry. I have yet to verify this, so I guess just stick to soft peaks for the time being4. Turn over the cake immediately after removing from the oven to prevent it from sinking and shrinking from the sides.

 fellow flickr friend, now turned good msn buddies, Pei Lin made me feel guilty for not trying out the recipes in the book "Paris Sweets" by Dorie Greenspan.. Since making tarts were always on my mind which I somehow never got around to do it, which I blame on the dazzling list of distracting recipes to try, I finally plucked up some courage and tried a really simple chocolate tart.
 Sad to say, I don't think I've quite succeeded in ti as the chocolate filling seemed a little separated and..oily?? I wasn't sure if I'm supposed to wait till the chocolate as fully blended with the cream before adding the yolks..and the moment I did, the mixture looked separated, my heart ached for the expensive Valrhona. Heck! I shall continue and not waste my good chocolate. Turns out, the chocolate became smooth in the end, BUT was a little..oily..not like ganache at all! Felt like some water made its way in there and spoilt my chocolate mixture! argh!
 Despite that, the chocolate took super long to set. Even after basking in the fridge for more than half an hour, the chocolate still remain pretty soft. Check out the picture above and you'll see what I mean.
 Probably not THE best, but defnitely good enough for me. =D
 Probably not THE best, but defnitely good enough for me. =D


 That aside, this recipe is really really easy. you don't need a mixer. just a whisk or a wooden spoon and 1 mixing bowl. you're good to go. i got every mixed in less than 10 minutes. quick. fuss free. and yummy =)


 I made these buns with the sponge and dough method again but this time, it didn't feel as successful as the other time. The songe portion felt like it overproofed as I could smell hints of alcohol. I went ahead as I have already prepared the ingriedients for the dough portion. To my surprise, while interviewing my sis abt the bread, she mentioned that this time, the "bread taste" was present..my heart skipped a beat, though I was puzzled as to why (since the dough kinda overproofed) It still remains as a mystery as of now but I'm glad with how it turned out =p
 Had a guest photographer today and so, the pics uploaded are all taken by him =p The tops looked a little too brown and burnt, but they tasted perfectly alright. It seemed like the durian was too thick and heavy and the batter was super duper thick. I guess i was overly generous with the durian and it tasted more like 榴莲糕 rather than a muffin =X




 Posts
Posts


.jpg)


